소개
Xcode 15에서 작업하다가 위젯을 추가하고 싶어서 Widget Extension을 추가하였는데, 위젯의 최소 배포 타깃(Minimum Deployments Target) 버전을 15.0 이상으로 잡고 진행하고 싶은 경우가 있을 것입니다.

그래서 버전을 바꾸면 어떻게 될까요? 기본으로 제공하는 코드가 아래와 같이 iOS 17.0 이상을 요구하는 부분들이 많기 때문에 하위 호환성이 떨어지고 처리해야 할 분기 작업이 매우 많아집니다.
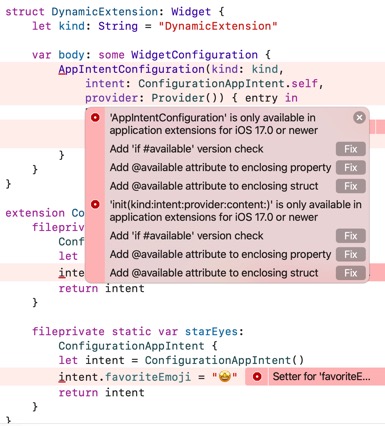
따라서, 이번 포스트에서는 Xcode 15에서 기본으로 제공되는 코드들을 제거하고 15.0 이상에서 위젯이 호환되도록 바꾸는 작업을 다룰 것입니다.
작업 순서
Widget Extension 추가
- Xcode -> File -> Target

- Widget Extension > Next > 이름 입력 후
Finish include Configuration <span style="text-decoration: underline;">"App"</span> Intent는 17.0에서 새로 도입되었습니다.- 어차피 코드를 하위 호환되는
Configuration Intent로 전부 치환해서 새로 작성할 것이기 때문에 체크 여부는 상관없습니다. - 사용자가 위젯을 편집할 수 있는 기능입니다.
- 어차피 코드를 하위 호환되는
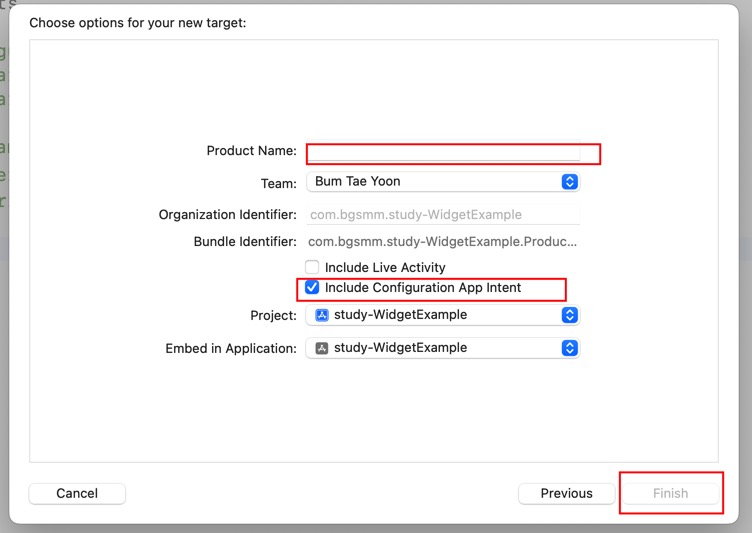
프로젝트가 생성되는데 배포 타깃 버전을 아직 바꾸면 안됩니다.
Intent Definition 파일 추가
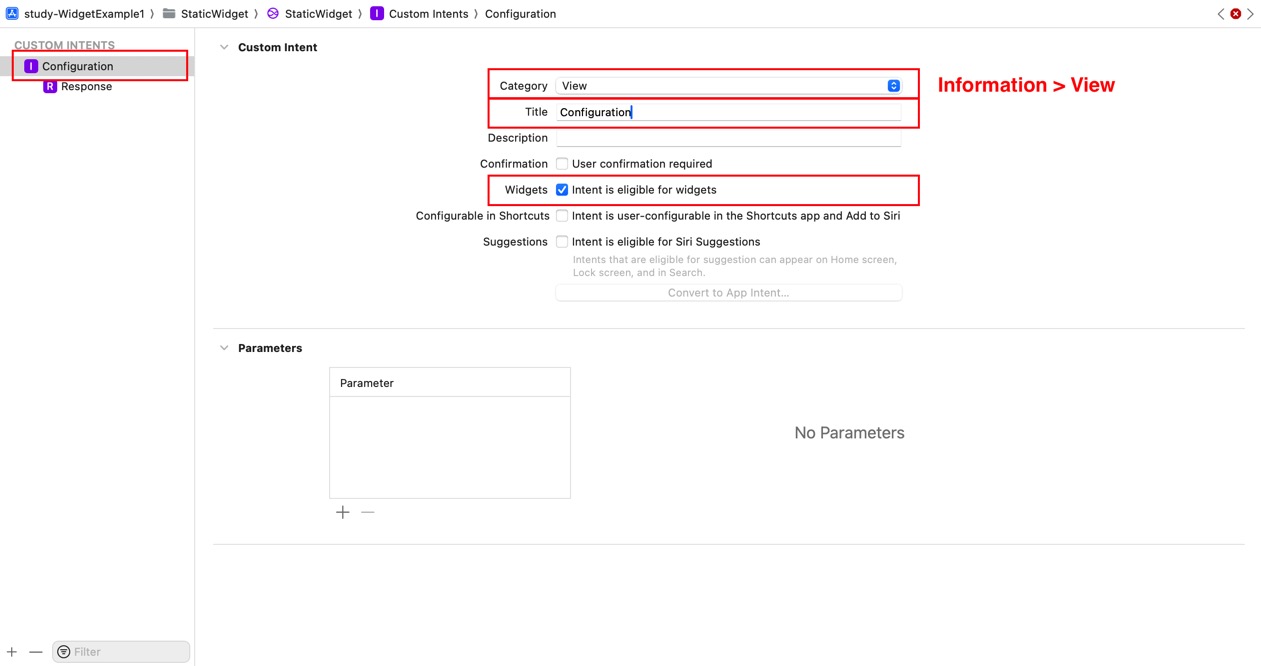
위젯 프로젝트에서 File > New를 선택해 SiriKit Intent Definition를 추가 (확장자 *.intentdefinition) 합니다.

생성된 파일을 열면 편집기가 나오는데 이름을 Configuration으로 설정하고, 아래 빨간 박스들을 체크합니다.
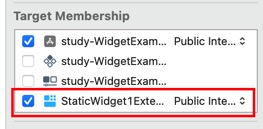
Intent 파일의 Target Membership에서 위젯 프로젝트를 체크합니다.
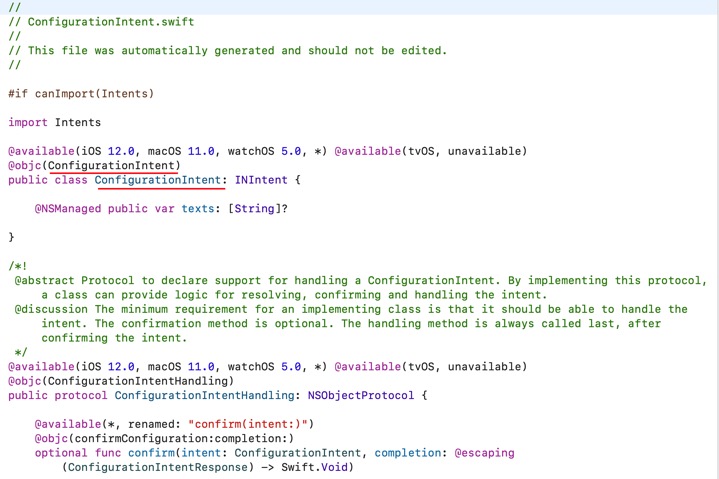
빌드를 합니다. 빌드는 반드시 성공해야 아래와 같이 자동 생성 클래스가 추가됩니다.

@main 구조체를 제외하고 전부 제거
기본 제공 코드 중 @main 부분(struct 프로젝트명Bundle) 을 제외한 아래 구조체 등을 전부 주석 처리하거나 제거합니다.
/*
 ============= 17.0 이상 전용 =============
 */

// struct Provider: AppIntentTimelineProvider {
//     func placeholder(in context: Context) -> SimpleEntry {
//         SimpleEntry(date: Date(), configuration: ConfigurationAppIntent())
//     }
//
//     func snapshot(for configuration: ConfigurationAppIntent, in context: Context) async -> SimpleEntry {
//         SimpleEntry(date: Date(), configuration: configuration)
//     }
//
//     func timeline(for configuration: ConfigurationAppIntent, in context: Context) async -> Timeline<SimpleEntry> {
//         var entries: [SimpleEntry] = []
//
//         // Generate a timeline consisting of five entries an hour apart, starting from the current date.
//         let currentDate = Date()
//         for hourOffset in 0 ..< 5 {
//             let entryDate = Calendar.current.date(byAdding: .hour, value: hourOffset, to: currentDate)!
//             let entry = SimpleEntry(date: entryDate, configuration: configuration)
//             entries.append(entry)
//         }
//
//         return Timeline(entries: entries, policy: .atEnd)
//     }
// }
//
// struct SimpleEntry: TimelineEntry {
//     let date: Date
//     let configuration: ConfigurationAppIntent
// }
//
// struct StaticWidget1EntryView : View {
//     var entry: Provider.Entry
//
//     var body: some View {
//         VStack {
//             Text("Time:")
//             Text(entry.date, style: .time)
//
//             Text("Favorite Emoji:")
//             Text(entry.configuration.favoriteEmoji)
//         }
//     }
// }
//
// struct StaticWidget1: Widget {
//     let kind: String = "StaticWidget1"
//
//     var body: some WidgetConfiguration {
//         AppIntentConfiguration(kind: kind, intent: ConfigurationAppIntent.self, provider: Provider()) { entry in
//             StaticWidget1EntryView(entry: entry)
//                 .containerBackground(.fill.tertiary, for: .widget)
//         }
//     }
// }
//
// extension ConfigurationAppIntent {
//     fileprivate static var smiley: ConfigurationAppIntent {
//         let intent = ConfigurationAppIntent()
//         intent.favoriteEmoji = "😀"
//         return intent
//     }
//
//     fileprivate static var starEyes: ConfigurationAppIntent {
//         let intent = ConfigurationAppIntent()
//         intent.favoriteEmoji = "🤩"
//         return intent
//     }
// }
//
// #Preview(as: .systemSmall) {
//     StaticWidget1()
// } timeline: {
//     SimpleEntry(date: .now, configuration: .smiley)
//     SimpleEntry(date: .now, configuration: .starEyes)
// }
// struct ConfigurationAppIntent: WidgetConfigurationIntent {
//     static var title: LocalizedStringResource = "Configuration"
//     static var description = IntentDescription("This is an example widget.")
//
//     // An example configurable parameter.
//     @Parameter(title: "Favorite Emoji", default: "😃")
//     var favoriteEmoji: String
// }
제거하면 다음과 같이 프로젝트명Bundle 구조체만 남습니다. 아래를 시작점으로 해서 하위 호환 코드들을 추가합니다
import SwiftUI
import WidgetKit

@main
struct StaticWidget1Bundle: WidgetBundle {
    var body: some Widget {
        StaticWidget1()
    }
}
(1) StaticWidget1 구조체 추가
struct StaticWidget1: Widget {
    let kind: String = "StaticWidget1"

    var body: some WidgetConfiguration {
        IntentConfiguration(kind: kind, intent: ConfigurationIntent.self, provider: Provider()) { entry in
            StaticWidget1EntryView(entry: entry)
        }
        .configurationDisplayName("** Static Widget 1")
        .description("** This is an example widget.")
    }
}
(2) StaticWidget1EntryView 추가
struct StaticWidget1EntryView: View {
    var entry: Provider.Entry

    var body: some View {
        VStack {
            Text("Time:")
            Text(entry.date, style: .time)
        }
    }
}
(3) SimplyEntry 추가
struct SimpleEntry: TimelineEntry {
    let date: Date
    let configuration: ConfigurationIntent
}
(4) Provider 추가
struct Provider: IntentTimelineProvider {
    func placeholder(in context: Context) -> SimpleEntry {
        SimpleEntry(date: Date(), configuration: ConfigurationIntent())
    }

    func getSnapshot(for configuration: ConfigurationIntent, in context: Context, completion: @escaping (SimpleEntry) -> Void) {
        let entry = SimpleEntry(date: Date(), configuration: configuration)
        completion(entry)
    }

    func getTimeline(for configuration: ConfigurationIntent, in context: Context, completion: @escaping (Timeline<SimpleEntry>) -> Void) {
        Task {
            await completion(timeline(for: configuration, in: context))
        }
    }

    func timeline(for configuration: ConfigurationIntent, in context: Context) async -> Timeline<SimpleEntry> {
        var entries: [SimpleEntry] = []

        // Generate a timeline consisting of five entries an hour apart, starting from the current date.
        let currentDate = Date()
        for hourOffset in 0 ..< 5 {
            let entryDate = Calendar.current.date(byAdding: .hour, value: hourOffset, to: currentDate)!
            let entry = SimpleEntry(date: entryDate, configuration: configuration)
            entries.append(entry)
        }

        return Timeline(entries: entries, policy: .atEnd)
    }
}
빌드 및 실행
위젯의 최소 배포 타깃을 15.0으로 변경하고 빌드 및 실행합니다.
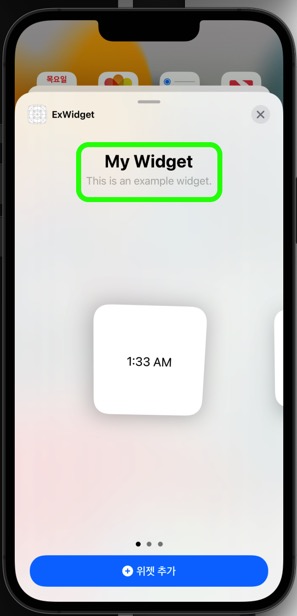
시뮬레이터에서
- 컴파일 에러가 발생하지 않으면서
- 위젯이 정상적으로 표시되고 추가되는지
확인합니다.
하위 호환 처리가 완료되었다면 이후 과정은 출처의 시리즈를 따라 진행하면 됩니다. (비동기 텍스트 및 사진 표시)
