소개
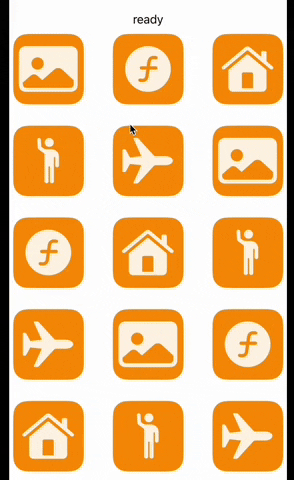
SwiftUI에서 여러 개의 버튼을 드래그로 선택할 수 있는 예제입니다.
- 클릭으로도 선택 가능하고 터치 드래그를 멈춰도 선택 가능합니다.
예전에 올렸던 SwiftUI 예제: 알파벳 내비게이터(Alphabet Navigator) 만들기 에서 사용했던 기술을 버튼으로 바꿔서 구현한 것입니다.
스타트 코드
struct DragActionView: View {
  let icons = [
    "photo.fill",
    "f.cursive.circle.fill",
    "house.fill",
    "figure.wave",
    "airplane",
  ]

  // 화면을 그리드형식으로 꽉채워줌
  var columns: [GridItem] {
    return (1...3).map { _ in
      GridItem(.flexible(), spacing: 30)
    }
  }

  var body: some View {
    Text("ready")
    LazyVGrid(columns: columns, spacing: 30) {
      ForEach(0..<15) { index in
        Button {
          // Button Action
        } label: {
          Image(systemName: icons[index % 5])
            .resizable()
            .scaledToFit()
            .frame(height: 65)
            .foregroundStyle(.white)
        }
        .frame(width: 100, height: 100)
        .background(.orange)
        .clipShape(RoundedRectangle(cornerSize: CGSize(width: 20, height: 10)))
        .controlSize(.large)
      }
    }
  }
}
위 코드는 15개의 아이콘이 포함된 버튼을 화면에 그립니다.
구현
Step 1: 버튼에 액션 추가
버튼을 누르면 현재 아이콘의 제목이 상단에 뜨도록 변경하겠습니다.
// Button Action 코멘트되어 있는 부분을 다음으로 대치합니다.
Button {
  currentButtonIndex = index
} label: { ... }
Text("ready") 부분을 현재 인덱스에 따라 동적으로 타이틀이 변경되도록 바꿉니다.
참고로, 아이콘의 인덱스는 스타트 코드의 ForEach(0..<15)문에서 정의되어 있습니다.
Text("\(currentButtonIndex >= 0 ? icons[currentButtonIndex % 5] : "ready")")
- 인덱스가
0이상이면icons배열의 인덱스에 해당하는 제목을 보여주고, 아니라면"ready"를 보여줍니다.- 예제 배열에 아이콘이 5개밖에 없기 때문에 나머지(
%) 연산자를 써서 반복해서 보여주도록 했습니다.
- 예제 배열에 아이콘이 5개밖에 없기 때문에 나머지(
Step 2: 상태 변수 추가
뷰의 멤버 변수에 제스처 전용 상태(@GestureState)와 현재 선택된 버튼의 인덱스를 저장하는 @State 변수를 추가합니다.
@GestureState private var dragLocation: CGPoint = .zero
@State var currentButtonIndex = -1
Step 3: GeometryReader 기반의 드래그 옵저버 추가
GeometryReader는 ‘View’ 그 자체이며, container안 View 스스로의 크기와 위치를 함수로 정의합니다. 해당 정보는 GeometryReader의GeometryProxy파라미터 인자를 통해 저장되어 있습니다.
아래 함수를 뷰 구조체 내에 추가합니다.
func dragObserver(value: Any? = nil) -> some View {
  GeometryReader { geometry in
    _dragObserver(geometry: geometry, value: value)
  }
}
Any? 타입의 value 변수를 받아서 GeometryReader 안에 있는 _dragObserver(...)에게 뷰 위치 정보(geometry) 및 value값을 전달합니다.
_dragObserver를 추가합니다.
private func _dragObserver(geometry: GeometryProxy, value: Any?) -> some View {
  if geometry.frame(in: .global).contains(dragLocation) {
    DispatchQueue.main.async {
      withAnimation {
        if let value = value as? Int {
          currentButtonIndex = value
        } else {
          currentButtonIndex = -1
        }
      }
    }
  }

  return Rectangle().fill(.clear)
}
- 겉보기에는 투명색 사각형이지만,
dragLocation으로부터 드래그 위치 정보를 받아 현재 자신(_dragObserver의 영역)을 가리키고 있는지 체크합니다. - 드래그를 인식하기 원하는 곳에 dragObserver를
background로 등록하면 화면을 드래그할 때마다 등록된 영역을 인식합니다. value가Int(인덱스 값의 타입)이면currentButtonIndex에 현재 버튼의 인덱스를 대입합니다.- 버튼이 아니라면
currentButtonIndex = -1로 둡니다. withAnimation으로 감싸면 상태 변수로 인한 UI의 변화에 애니메이션이 적용됩니다.
Step 3: 인식하고자 하는 버튼에 dragObserver를 배경으로 추가
이 예제에서는 버튼에 드래그를 인식시키고자 하므로 버튼에 background 변경자(modifier)를 추가합니다.
Button {
  currentButtonIndex = index
} label: {
  ...
}
.frame(width: 100, height: 100)
.background(.orange)
.background(dragObserver(value: index))
- 이제 드래그로 이 버튼 위치로 이동하면
dragObserver가 동작하며currentButtonIndex가 여기서 부여한index로 바뀌게 됩니다.
그리고 LazyVGrid의 밑에도 dragObserver를 등록합니다.
여기에 추가하는 이유는 버튼이 아닌 곳을 드래그했을 경우 현재 버튼을 선택하지 않았다는 것을 currentButtonIndex에 알려주기 위함입니다. nil을 value로 보냄으로써 _dragObserver의 if문에 따라 currentButtonIndex는 -1이 될 것입니다.
LazyVGrid(columns: columns, spacing: 30) {
  ...
}
// 버튼 사이의 빈 공간을 눌렀을 때 인식
.background(dragObserver(value: nil))
Step 4: 버튼에 highPriorityGesture를 사용해 드래그를 우선적으로 인식하도록 바꾸기
Button {
  currentButtonIndex = index
} label: {
  ...
}
.highPriorityGesture(DragGesture(minimumDistance: 0, coordinateSpace: .global)
  .updating($dragLocation) { value, state, _ in
    state = value.location
  })
버튼은 기본적으로 탭(클릭)을 우선적으로 인식하므로, highPriorityGesture 변경자를 이용해 드래그 제스처(DragGesture)를 우선적으로 인식하도록 지정합니다.
updating의 트레일링 클로저는 드래그 제스처는 현재 상태(state)와 정보값(value)을 가지고 있습니다.- 좌표 공간을 전역으로 잡고, 정보값의 위치가 변경될때마다 상태에 반영되도록 해줍니다.
여기까지 작업한 뒤 ‘시뮬레이터 또는 실제기기’로 빌드 및 실행하면 드래그가 인식하는 것을 확인할 수 있습니다. 현재 ‘SwiftUI Preview’에서는 드래그 동작이 먹히지 않는데 시뮬레이터 등으로 실행하면 정상 작동합니다. 프리뷰에서는 드래그 제스처가 동작하지 않는 이유에 대해 찾아보고 있습니다.
Step 5: 현재 선택된 버튼을 강조표시합니다.
currentButtonIndex 상태 변수를 이용해서 현재 선택된 경우 강조된 디자인으로 버튼을 보여줄 수 있습니다.
LazyVGrid(columns: columns, spacing: 30) {
ForEach(0..<15) { index in
Button {
currentButtonIndex = index
} label: {
Image(systemName: icons[index % 5])
.resizable()
.scaledToFit()
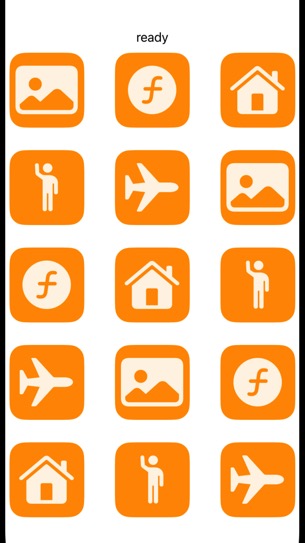
.frame(height: currentButtonIndex == index ? 70 : 65)
.foregroundStyle(.white.opacity(currentButtonIndex == index ? 1 : 0.9))
}
.frame(width: 100, height: 100)
.background(currentButtonIndex == index ? .yellow : .orange)
.background(dragObserver(value: index))
.clipShape(RoundedRectangle(cornerSize: CGSize(width: 20, height: 10)))
.controlSize(.large)
.highPriorityGesture(DragGesture(minimumDistance: 0, coordinateSpace: .global)
.updating($dragLocation) { value, state, _ in
state = value.location
})
}
}
선택될 때마다 손가락(포인터)의 위치에 강조표시가 되는 것을 볼 수 있습니다.
전체 코드
위의 내용을 모두 반영한 전체 코드입니다.
import SwiftUI

struct DragActionView: View {
  let icons = [
    "photo.fill",
    "f.cursive.circle.fill",
    "house.fill",
    "figure.wave",
    "airplane",
  ]

  // 화면을 그리드형식으로 꽉채워줌
  var columns: [GridItem] {
    return (1...3).map { _ in
      GridItem(.flexible(), spacing: 30)
    }
  }

  @GestureState private var dragLocation: CGPoint = .zero
  @State var currentButtonIndex = -1

  func dragObserver(value: Any? = nil) -> some View {
    GeometryReader { geometry in
      _dragObserver(geometry: geometry, value: value)
    }
  }

  private func _dragObserver(geometry: GeometryProxy, value: Any?) -> some View {
    if geometry.frame(in: .global).contains(dragLocation) {
      DispatchQueue.main.async {
        withAnimation {
          if let value = value as? Int {
            currentButtonIndex = value
          } else {
            currentButtonIndex = -1
          }
        }
      }
    }

    return Rectangle().fill(.clear)
  }

  var body: some View {
    Text("\(currentButtonIndex >= 0 ? icons[currentButtonIndex % 5] : "ready")")
    LazyVGrid(columns: columns, spacing: 30) {
      ForEach(0..<15) { index in
        Button {
          currentButtonIndex = index
        } label: {
          Image(systemName: icons[index % 5])
            .resizable()
            .scaledToFit()
            .frame(height: currentButtonIndex == index ? 70 : 65)
            .foregroundStyle(.white.opacity(currentButtonIndex == index ? 1 : 0.9))
        }
        .frame(width: 100, height: 100)
        .background(currentButtonIndex == index ? .yellow : .orange)
        .background(dragObserver(value: index))
        .clipShape(RoundedRectangle(cornerSize: CGSize(width: 20, height: 10)))
        .controlSize(.large)
        .highPriorityGesture(DragGesture(minimumDistance: 0, coordinateSpace: .global)
          .updating($dragLocation) { value, state, _ in
            state = value.location
          })
      }
    }
    // 버튼 사이의 빈 공간을 눌렀을 때 인식
    .background(dragObserver(value: nil))
  }
}


0개의 댓글