Swift 예제: iOS + WatchOS 연동 앱 LinkedCounter
전체 코드
개발 환경
- Xcode 13.3.1, Swift 5
- iOS App with Watch App 템플릿
- Storyboard Interface (워치 앱에 부분적으로 SwiftUI 사용)
목적
- 워치용 앱 기본 개발 학습
- 아이폰 앱 워치 앱 간 데이터 연동 방법 학습
- 컴플리케이션(Complication) 기본 개발 학습
필수 참고 글
- 워치 앱 개발의 기본 방법 및 아이폰 앱 – 워치 앱간 통신
- 컴플리케이션 제작 방법
- 컴플리케이션 애플 공식 문서
이 글은 설명글이 아니고 개인적인 복습을 위해 주요 내용을 요약한 글입니다. 애플 워치 개발에 관한 설명글은 위의 글들을 번역해서 따로 올리도록 하겠습니다.
동작 내용
- 기본적으로 버튼을 누르면 숫자가 증감하는 카운터 앱입니다.
- 모든 데이터는 아이폰 앱에서
UserDefaults로 관리됩니다. - 애플 워치 앱은 아이폰과 연결해 아이폰 내부의
UserDefaults정보를 통신으로 받아오고 정보를 표시합니다. - 아이폰의 전원이 꺼지지 않는 한 앱이 백그라운드 모드이거나 꺼져있어도 서로 정보를 통신하고 동기화할 수 있습니다.
- 아이폰 앱에서 숫자를 증감시키면 애플 워치 앱에 실시간으로 반영됩니다.
- 반대로 애플워치 앱에서 숫자를 증감시켜도 아이폰 앱에서 실시간으로 반영됩니다.
- 이 때 통신상태 불량으로 인한 데이터 불일치를 방지하기 위해 싱크 검증 기능이 있습니다.
(시뮬레이터는 통신 속도가 느려 싱크 과정에서 딜레이가 있습니다.)
- 현재 카운트 수 및
현재 카운트 수 / 목표 수치의 진행율을 표시하는 컴플리케이션 기능(CLKComplicationTemplateCircularSmallRingText)이 있습니다.
1000으로 목표 수치 설정
현재 카운트 수 / 목표 수치 = 450 / 1000 = 45% 분량의 진행율이 프로그레스 링으로 표시
카운트 수가 1000이 넘으면 1K로 표시
(CLKComplicationTemplateCircularSmallRingText의 표시 자리수 한계 방지를 위함)
주요 과정 정리
1) 사전 작업
- 시뮬레이터에서 아이폰 디바이스와 워치 모델을 연결시켜야 합니다.

2) 아이폰 앱 개발
- 먼저 애플 워치를 고려하지 않고 아이폰 단독 앱을 개발합니다. 스토리보드 구조는 아래와 같습니다.

3) 워치 앱 UI 디자인
- 다음, 워치 앱을 개발합니다.
- 워치 앱은 개발 요소에 제약이 있습니다.
UIView가 없고, 추가할 수 있는 UI Component 종류의 수도 적습니다.- Constraint 개념이 없고, 요소를 수직으로만 쌓을 수 있습니다.
@IBAction연결 시sender파라미터가 없습니다.- 그 외 레이블로부터 텍스트를 가져올 수 없고 설정만 가능한 것 등
- 워치 부분(WatchKit)은
App과Extension으로 나뉘어 있습니다.WatchKit App은 스토리보드처럼 UI 표시 부분만 담당합니다.WatchKit Extension은 컨트롤러가 모여있는 부분으로 Inerface, Notification, Complication 등의 데이터를 관리하고 UI 측(WatchKit App)에 전달합니다.
- Label과 Button만 이용해 아래 UI 요소를
Interface Controller Scene에 추가합니다.Interfaces는 앱을 열었을 때 바로 첫 화면을 표시하는 부분입니다.- 여기서 UI 컴포넌트를 추가하고, 연동 작업은 WatchKit Extension의 InterfaceController.swift에서 작성합니다.

- InterfaceController.swift 중 UI 관련된 부분 코드
import WatchKit
import Foundation
import WatchConnectivity
import ClockKit

class InterfaceController: WKInterfaceController {

    enum LabelStatus {
        case stepValue, normal, error
    }

    @IBOutlet weak var lblTotalCount: WKInterfaceLabel!
    @IBOutlet weak var lblStatus: WKInterfaceLabel!
    @IBOutlet weak var btnMinus: WKInterfaceButton!
    @IBOutlet weak var btnPlus: WKInterfaceButton!

    private var totalCount: Double!
    private var plusCount: Double!

    private var initTotalCountLoaded = false
    private var initPlusCountLoaded = false

    override func awake(withContext context: Any?) {
        // Configure interface objects here.
    }

    override func willActivate() {
        // This method is called when watch view controller is about to be visible to user
    }

    override func didDeactivate() {
        // This method is called when watch view controller is no longer visible    }

    // MARK: - UI Helper

    private func turnAllButton(_ isEnable: Bool) {
        btnPlus.setEnabled(isEnable)
        btnMinus.setEnabled(isEnable)
    }

    private func setCountLabel(_ text: String, color: UIColor = .white) {
        lblTotalCount.setTextColor(color)
        lblTotalCount.setText(text)
    }

    private func setStatus(_ status: LabelStatus, _ text: String) {
        switch status {
        case .stepValue:
            lblStatus.setTextColor(.white)
            lblStatus.setText("Step Value: \(text)")
        case .normal:
            lblStatus.setTextColor(.white)
            lblStatus.setText(text)
        case .error:
            lblStatus.setTextColor(.red)
            lblStatus.setText("Error: \(text)")
        }
    }

    // MARK: - @IBActions

    @IBAction func btnActRefresh() {
       fetchDataFromRootDevice()
    }

    @IBAction func btnActMinus() {
        print(#function)
        // 시계 디스플레이는 plusCount 만큼 일단 올리고
        // 맞으면 확정 표시
        // 틀리면 롤백
        guard let plusCount = plusCount else { return }
        totalCount = totalCount - plusCount
        setCountLabel(totalCount.intText, color: .darkGray)
    }

    @IBAction func btnActPlus() {
        print(#function)
        // 시계 디스플레이는 plusCount 만큼 일단 올리고
        // 맞으면 확정 표시
        // 틀리면 롤백
        guard let plusCount = plusCount else { return }
        totalCount = totalCount + plusCount
        setCountLabel(totalCount.intText, color: .darkGray)
        setStatus(.normal, "Syncing...")
    }
}
- 시뮬레이터로 빌드 및 실행합니다. 기능은 동작하지 않지만 버튼 및 레이블은 정상적으로 표시되어야 합니다.
4) 아이폰 앱 – 워치 앱 통신 구현
애플 워치에서 아이폰으로 요청
- InterfaceController.swift의 멤버 변수 및
willActivate()에 다음 코드를 추가합니다.WCSession은 아이폰 워치가 통신할 수 있도록 하는 매개체입니다.willActivate()안에는 앱을 열었을 때 실행해야할 동작을 지정합니다.
// 1: Session property
private var session = WCSession.default

override func willActivate() {
    // This method is called when watch view controller is about to be visible to user

    // 2: Initialization of session and set as delegate this InterfaceController if it's supported
    if WCSession.isSupported() {
        session.delegate = self
        session.activate()
    }
}
- 먼저 워치의 InterfaceController.swift에서 아이폰 앱에 요청(
request)을 보내고 응답(response)을 받는 코드를 작성합니다.. session.sendMessage(...)메서드를 이용합니다.["request": "totalCount_get"]이라는 메시지를 아이폰 앱으로 보냅니다.
func sendMessage(_ message: [String : Any],
                   replyHandler: (([String : Any]) -> Void)?,
                   errorHandler: ((Error) -> Void)? = nil)
session.sendMessage(makeRequest("totalCount_get")) { response in
    if let totalCount = response["response"] as? Double {
        self.totalCount = totalCount
        self.setCountLabel(totalCount.intText)
        self.initTotalCountLoaded = true
        // Set CurrentData
        CurrentData.shared.currentTotalCount = totalCount
        if self.initPlusCountLoaded {
            self.turnAllButton(true)
        }
    } else {
        self.setCountLabel("ERROR", color: .red)
    }
} errorHandler: { error in
    print("Error sending message: %@", error)
    self.setCountLabel("ERROR", color: .red)
}
- 다음 아이폰에서 워치측의 요청을 처리하는 코드를 작성합니다.
- 아이폰 프로젝트에 SessionHandler.swift 파일을 생성하고 아래 코드를 추가합니다.
WCSessionDelegate의extension안에 있는func session(...didReceiveMessage...)부분이 요청을 처리하는 곳입니다.
import Foundation
import WatchConnectivity

class SessionHandler : NSObject, WCSessionDelegate {

    // 1: Singleton
    static let shared = SessionHandler()

    // 2: Property to manage session
    var session = WCSession.default

    override init() {
        super.init()

        // 3: Start and activate session if it's supported
        if WCSession.isSupported() {
            session.delegate = self
            session.activate()
        }

        print("isPaired?: \(session.isPaired), isWatchAppInstalled?: \(session.isWatchAppInstalled)")
    }

    func isSupported() -> Bool {
        WCSession.isSupported()
    }

    // MARK: - WCSessionDelegate

    // 4: Required protocols

    // a
    func session(_ session: WCSession, activationDidCompleteWith activationState: WCSessionActivationState, error: Error?) {
        print("activationDidCompleteWith activationState:\(activationState) error:\(String(describing: error))")
    }

    // b
    func sessionDidBecomeInactive(_ session: WCSession) {
        print("sessionDidBecomeInactive: \(session)")
    }

    // c
    func sessionDidDeactivate(_ session: WCSession) {
        print("sessionDidDeactivate: \(session)")
        // Reactivate session
        /**
         * This is to re-activate the session on the phone when the user has switched from one
         * paired watch to second paired one. Calling it like this assumes that you have no other
         * threads/part of your code that needs to be given time before the switch occurs.
         */
        self.session.activate()
    }

    /// Observer to receive messages from watch and we be able to response it
    ///
    /// - Parameters:
    ///   - session: session
    ///   - message: message received
    ///   - replyHandler: response handler
    func session(_ session: WCSession, didReceiveMessage message: [String : Any], replyHandler: @escaping ([String : Any]) -> Void) {
        guard let request = message["request"] as? String else {
            return
        }

        switch request {
        case "plusCount_get":
            replyHandler(makeResponse(localStorage.double(forKey: .cfgPlusCount)))
        case "totalCount_get":
            replyHandler(makeResponse(localStorage.double(forKey: .cfgTotalCount)))
        case "totalCount_plus":
            let oldValue = localStorage.double(forKey: .cfgTotalCount)
            let plusCount = localStorage.double(forKey: .cfgPlusCount)
            let newValue = oldValue + (plusCount > 0 ? plusCount : 5.0)
            localStorage.set(newValue, forKey: .cfgTotalCount)
            replyHandler(makeResponse(newValue))
            NotificationCenter.default.post(name: .refreshView, object: nil)
        case "totalCount_minus":
            let oldValue = localStorage.double(forKey: .cfgTotalCount)
            let plusCount = localStorage.double(forKey: .cfgPlusCount)
            let newValue = oldValue - (plusCount > 0 ? plusCount : 5.0)
            localStorage.set(newValue, forKey: .cfgTotalCount)
            replyHandler(makeResponse(newValue))
            NotificationCenter.default.post(name: .refreshView, object: nil)
        case "targetCount_get":
            replyHandler(makeResponse(localStorage.double(forKey: .cfgTargetCount)))
        default:
            break
        }
    }

    func sendDataForComplication() {
        print(#function, session.isReachable)
        if session.isReachable {
            session.transferCurrentComplicationUserInfo(["request": "forComplication"])
        }
    }

}
["request": "totalCount_get"]라는 메시지를 받은 아이폰 앱은guard let request = message["request"]를 통과하고switch request문에서"totalCount_get"부분을 찾은 뒤replyHandler([String:Any])를 이용해 워치 앱 측으로["response": 현재카운트]응답을 보냅니다.- 해당 응답을 받은 워치 앱은 응답 내용을 바탕으로 워치 앱에 정보를 표시합니다.
아이폰에서 애플 워치로 요청
- 데이터는 전부 아이폰에서 관리하기 때문에 아이폰에서 애플워치르 보낼 때엔 request만 필요하고 response는 받을 필요가 없습니다.
- 아이폰 프로젝트의 뷰 컨트롤러 클래스 안에 멤버변수로 다음을 추가합니다.
// 1: Get singleton class whitch manage WCSession
var connectivityHandler = SessionHandler.shared
- 요청이 필요한 순간에 session.sendMessage(…replyHandler…)를 사용합니다.
- 예) 버튼을 눌렀을 때
connectivityHandler.session.sendMessage(makeRequestForSendToWatch(totalCount: stepperTotalCount.value, plusCount: stepperPlusCount.value), replyHandler: nil) { error in
    print("Error sending message: \(error)")
}
func makeRequestForSendToWatch(totalCount: Double, plusCount: Double, targetCount: Double? = nil) -> [String: Any] {
    var dict = [
        "totalCount": totalCount,
        "plusCount": plusCount,
    ]

    if let targetCount = targetCount {
        dict["targetCount"] = targetCount
    }

    return dict
}
- 애플 워치의 인터페이스 컨트롤러의 WCSessionDelegate 확장 안에 아이폰으로부터 받은 요청을 처리하는 코드를 작성합니다.
- 요청값을 받으면, 그 값으로 레이블을 최신 정보로 업데이트합니다.
- 만약 아이폰으로 응답을 보낼 필요가 있다면,
<span role="text">WCSession<wbr />Delegate<wbr />.session(_:<wbr />did<wbr />Receive<wbr />Message:<wbr />reply<wbr />Handler:)</span>.를 사용합니다.
// Receive messages from iPhone
func session(_ session: WCSession, didReceiveMessage message: [String : Any]) {
    // 1: We launch a sound and a vibration
    WKInterfaceDevice.current().play(.notification)

    if let totalCount = message["totalCount"] as? Double {
        self.totalCount = totalCount
        setCountLabel(totalCount.intText)
    }

    if let plusCount = message["plusCount"] as? Double, self.plusCount != plusCount {
        self.plusCount = plusCount
        setStatus(.stepValue, plusCount.intText)
    }

    if let targetCount = message["targetCount"] as? Double, CurrentData.shared.targetCount != targetCount {
        CurrentData.shared.targetCount = targetCount
        // reloadComplicationTimeline()

        self.setStatus(.normal, "Target: \(targetCount.intText)")
        DispatchQueue.main.asyncAfter(deadline: .now() + .seconds(2)) {
            self.setStatus(.stepValue, self.plusCount.intText)
        }
    }
}
통신 과정이 추가된 InterfaceController.swift 전체 코드
import WatchKit
import Foundation
import WatchConnectivity
import ClockKit

struct CurrentData {

    static var shared = CurrentData(currentTotalCount: nil, targetCount: nil)

    var currentTotalCount: Double?
    var targetCount: Double?
}

class InterfaceController: WKInterfaceController {

    enum LabelStatus {
        case stepValue, normal, error
    }

    @IBOutlet weak var lblTotalCount: WKInterfaceLabel!
    @IBOutlet weak var lblStatus: WKInterfaceLabel!
    @IBOutlet weak var btnMinus: WKInterfaceButton!
    @IBOutlet weak var btnPlus: WKInterfaceButton!

    // 1: Session property
    private var session = WCSession.default

    private var totalCount: Double!
    private var plusCount: Double!

    private var initTotalCountLoaded = false
    private var initPlusCountLoaded = false

    override func awake(withContext context: Any?) {
        // Configure interface objects here.
    }

    override func willActivate() {
        // This method is called when watch view controller is about to be visible to user

        // 2: Initialization of session and set as delegate this InterfaceController if it's supported
        if WCSession.isSupported() {
            session.delegate = self
            session.activate()
        }

        Timer.scheduledTimer(withTimeInterval: 0.1, repeats: true) { [unowned self] timer in
            print("timer", self.session.isReachable)
            if session.isReachable {
                fetchDataFromRootDevice()
                timer.invalidate()
            } else {
                print(#function, "iPhone is not reachable!!")
            }
        }
    }

    override func didDeactivate() {
        // This method is called when watch view controller is no longer visible
        reloadComplicationTimeline()

    }

    // MARK: - UI Helper

    private func turnAllButton(_ isEnable: Bool) {
        btnPlus.setEnabled(isEnable)
        btnMinus.setEnabled(isEnable)
    }

    private func setCountLabel(_ text: String, color: UIColor = .white) {
        lblTotalCount.setTextColor(color)
        lblTotalCount.setText(text)
    }

    private func setStatus(_ status: LabelStatus, _ text: String) {
        switch status {
        case .stepValue:
            lblStatus.setTextColor(.white)
            lblStatus.setText("Step Value: \(text)")
        case .normal:
            lblStatus.setTextColor(.white)
            lblStatus.setText(text)
        case .error:
            lblStatus.setTextColor(.red)
            lblStatus.setText("Error: \(text)")
        }
    }

    // MARK: - Handle Watch's system

    private func requestChangeTotalCount(_ request: String, completionHandler: @escaping () -> (), failedHandler: @escaping () -> ()) {
        if session.isReachable {
            session.sendMessage(makeRequest("totalCount_\(request)")) { response in

                if let totalCount = response["response"] as? Double {
                    self.totalCount = totalCount
                    self.setCountLabel(totalCount.intText)
                    // Set CurrentData
                    CurrentData.shared.currentTotalCount = totalCount
                    print("Request success:", totalCount)
                    completionHandler()
                } else {
                    print("Request failed:", #line)
                    failedHandler()
                }
            } errorHandler: { error in
                print("Error sending message: %@", error)
                failedHandler()
            }
        } else {
            print("Request failed:", #line)
            failedHandler()
        }
    }

    private func fetchDataFromRootDevice() {
        if session.isReachable {
            turnAllButton(false)

            setCountLabel("...")
            setStatus(.normal, "Loading status...")

            session.sendMessage(makeRequest("plusCount_get")) { response in
                if let plusCount = response["response"] as? Double {
                    self.plusCount = plusCount
                    self.setStatus(.stepValue, plusCount.intText)
                    self.initPlusCountLoaded = true
                    if self.initTotalCountLoaded {
                        self.turnAllButton(true)
                    }
                } else {
                    self.setStatus(.error, "Unknown")
                }
            } errorHandler: { error in
                print("Error sending message: %@", error)
                self.setStatus(.error, error.localizedDescription)
            }

            session.sendMessage(makeRequest("totalCount_get")) { response in
                if let totalCount = response["response"] as? Double {
                    self.totalCount = totalCount
                    self.setCountLabel(totalCount.intText)
                    self.initTotalCountLoaded = true
                    // Set CurrentData
                    CurrentData.shared.currentTotalCount = totalCount
                    if self.initPlusCountLoaded {
                        self.turnAllButton(true)
                    }
                } else {
                    self.setCountLabel("ERROR", color: .red)
                }
            } errorHandler: { error in
                print("Error sending message: %@", error)
                self.setCountLabel("ERROR", color: .red)
            }

            session.sendMessage(makeRequest("targetCount_get")) { response in
                if let targetCount = response["response"] as? Double {
                    CurrentData.shared.targetCount = targetCount
                }
            }
        }
    }

    private func reloadComplicationTimeline() {
        if let complication = CLKComplicationServer.sharedInstance().activeComplications?.first {
            CLKComplicationServer.sharedInstance().reloadTimeline(for: complication)
        }
    }

    // MARK: - @IBActions

    @IBAction func btnActRefresh() {
       fetchDataFromRootDevice()
    }

    @IBAction func btnActMinus() {
        print(#function)
        // 시계 디스플레이는 plusCount 만큼 일단 올리고
        // 맞으면 확정 표시
        // 틀리면 롤백
        guard let plusCount = plusCount else { return }
        totalCount = totalCount - plusCount
        setCountLabel(totalCount.intText, color: .darkGray)
        setStatus(.normal, "Syncing...")

        requestChangeTotalCount("minus") { [self] in
            setStatus(.stepValue, plusCount.intText)
            // Set CurrentData
            CurrentData.shared.currentTotalCount = totalCount
        } failedHandler: { [self] in
            totalCount = totalCount + plusCount
            setCountLabel(totalCount.intText)
        }
    }

    @IBAction func btnActPlus() {
        print(#function)
        // 시계 디스플레이는 plusCount 만큼 일단 올리고
        // 맞으면 확정 표시
        // 틀리면 롤백
        guard let plusCount = plusCount else { return }
        totalCount = totalCount + plusCount
        setCountLabel(totalCount.intText, color: .darkGray)
        setStatus(.normal, "Syncing...")

        requestChangeTotalCount("plus") { [self] in
            setStatus(.stepValue, plusCount.intText)
            // Set CurrentData
            CurrentData.shared.currentTotalCount = totalCount
        } failedHandler: { [self] in
            totalCount = totalCount - plusCount
            setCountLabel(totalCount.intText)
        }
    }
}


extension InterfaceController: WCSessionDelegate {

    // MARK: - WCSessionDelegate

    // 4: Required stub for delegating session
    func session(_ session: WCSession, activationDidCompleteWith activationState: WCSessionActivationState, error: Error?) {
        print("activationDidCompleteWith activationState:\(activationState) error:\(String(describing: error))")
    }

    // Receive messages from iPhone
    func session(_ session: WCSession, didReceiveMessage message: [String : Any]) {
        // 1: We launch a sound and a vibration
        WKInterfaceDevice.current().play(.notification)

        print(#function, message)
        if let totalCount = message["totalCount"] as? Double {
            self.totalCount = totalCount
            setCountLabel(totalCount.intText)
        }

        if let plusCount = message["plusCount"] as? Double, self.plusCount != plusCount {
            self.plusCount = plusCount
            setStatus(.stepValue, plusCount.intText)
        }

        if let targetCount = message["targetCount"] as? Double, CurrentData.shared.targetCount != targetCount {
            CurrentData.shared.targetCount = targetCount
            // reloadComplicationTimeline()

            self.setStatus(.normal, "Target: \(targetCount.intText)")
            DispatchQueue.main.asyncAfter(deadline: .now() + .seconds(2)) {
                self.setStatus(.stepValue, self.plusCount.intText)
            }
        }
    }

    func session(_ session: WCSession, didReceiveUserInfo userInfo: [String : Any] = [:]) {
        print("received UserInfo:", userInfo)
    }
}
5) 컴플리케이션 제작
- 컴플리케이션은 굉장히 많은 종류가 있는데, 시간 제한상
CLKComplicationTemplateCircularSmallRingText한 가지만 제작합니다. - 컴플리케이션은 ComplicationController.swift에서 다루게 됩니다.
- 컴플리키에션 구현에는 복잡한 특징이 있습니다.
- 컴플리케이션의 변화 내용을 앱이 실행된 때에 미리 타임라인 형태로 예약해서 등록합니다.
- 애플 워치의 과도한 작업으로 인한 성능 저하 및 배터리 누수를 막기 위해 특정 시간동안 표시할 수 있는 내용을 100회로 제한합니다.
- 컴플리케이션의 내용에 따라 앱이 실행된 때에만 업데이트가 한 번 필요한 경우 또는 앱이 실행 후 일정 시간동안 컴플리케이션을 여러 번 업데이트해야 하는 경우가 있습니다.
- 전자의 경우 타임라인을 사용하지 않으며, 타임라인을 사용하지 않더라도 컴플리케이션의 표시 날짜(
Date)는 등록해야 합니다. - 타임라인을 사용할 경우 타임라인의 종료 시간을 시스템에 미리 알려줘야 됩니다.
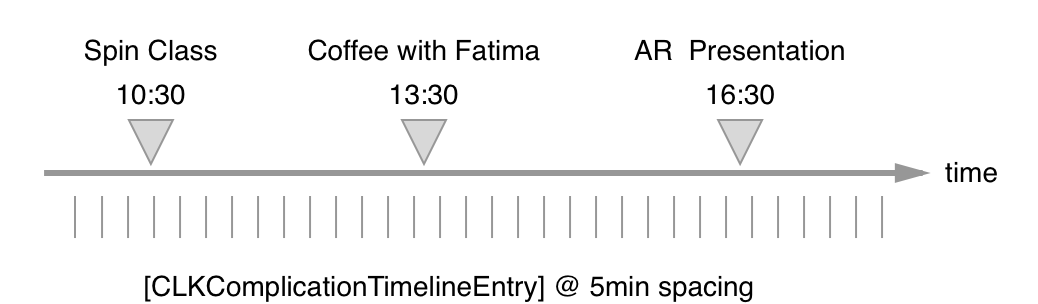
컴플리케이션의 타임라인 예시. 5분 간격으로 업데이트할 정보를 미리 등록합니다.
- 먼저
CLKComplicationTemplate을 반환하는 함수들을 추가합니다.CLKComplicationTemplate는 실제로 애플 워치 화면에 표시되는 컴플리케이션의 UI 인스턴스입니다.- 그래픽이 포함된 컴플리케이션은 SwiftUI의
View를 이용합니다. 예제 코드는 다음과 같습니다.case .graphicCircular: return CLKComplicationTemplateGraphicCircularView(ComplicationViewCircular(current: current, target: target)) // ================ Swift UI 부분 ================ // import SwiftUI import ClockKit struct ComplicationViewCircular: View { @State var current: Double @State var target: Double var body: some View {...} } CLKComplicationTemplate를 나중에 컴플레이케이션 표시 시간을 정하는 딜리게이트 메소드에서 지정합니다.
extension ComplicationController {

    func makeTemplate(image: UIImage, complication: CLKComplication) -> CLKComplicationTemplate? {
        switch complication.family {
        case .circularSmall:
            return CLKComplicationTemplateCircularSmallRingImage(imageProvider: CLKImageProvider(onePieceImage: image), fillFraction: 0.0, ringStyle: .closed)
        default:
            return nil
        }
    }

    func makeTemplate(current: Double, target: Double, complication: CLKComplication) -> CLKComplicationTemplate? {
        let percentage = current / target

        switch complication.family {
        case .circularSmall:
            return CLKComplicationTemplateCircularSmallRingText(textProvider: CLKTextProvider(format: current.rationalizedText), fillFraction: Float(percentage), ringStyle: .closed)
        default:
            return nil
        }
    }
}
기본 컴플리케이션 표시
- 다음
func getCurrentTimelineEntry(...withHandler...)에 기본 컴플리케이션을 추가합니다.
func getCurrentTimelineEntry(for complication: CLKComplication, withHandler handler: @escaping (CLKComplicationTimelineEntry?) -> Void) {
    // Call the handler with the current timeline entry

    if let template = makeTemplate(image: UIImage(systemName: "star.fill")!, complication: complication) {
        let entry = CLKComplicationTimelineEntry(date: Date(), complicationTemplate: template)
        handler(entry)
    } else {
        handler(nil)
    }
}
CLKComplicationTimelineEntry- 특정 시간대의 타임라인에 진입해 컴플리케이션을 표시합니다.
- 기본 컴플리케이션은 별표(★)만 표시합니다.
date에는 현재 순간을 의미하는Date()를 입력합니다.
handler(entry)를 실행되는 순간 컴플리케이션이 표시됩니다.
업데이트된 정보의 컴플리케이션 표시
- 미래에 업데이트될 정보는
func getTimeEntries(for...after...limit...)에서 실행합니다. - 이 앱에서는 아이폰 앱과의 통신 과정이 있으며, 앱이 실행된 순간 바로 정보를 알 수 있는게 아니고 아이폰으로부터 정보를 받아온 뒤 정보를 알 수 있는데, 그 과정에서 약간의 시간이 소요됩니다.
- 타이머를 돌려서 데이터가
nil이 아닌 경우(=데이터를 받아온 경우) 그 순간에 업데이트된 컴플리케이션 정보를 미래 엔트리에 등록합니다. - 이렇게 하면 앱을 닫은 후에도 컴플리케이션 정보가 업데이트됩니다.
버튼을 눌러 앱을 닫으면, 처음에는 기본 내용 별표(★)가 표시되었다가 잠시 뒤 정보가 업데이트되면 별표가 사라지고 해당 정보로 업데이트됩니다.
func getTimelineEntries(for complication: CLKComplication, after date: Date, limit: Int, withHandler handler: @escaping ([CLKComplicationTimelineEntry]?) -> Void) {
    // Call the handler with the timeline entries after the given date

    var dataRead = false

    Timer.scheduledTimer(withTimeInterval: 0.5, repeats: true) { [self] timer in

        if dataRead {
            timer.invalidate()
            return
        }

        var entries: [CLKComplicationTimelineEntry] = []

        if let totalCount = CurrentData.shared.currentTotalCount,
           let targetCount = CurrentData.shared.targetCount,
           let template = makeTemplate(current: totalCount, target: targetCount, complication: complication) {
            let entry = CLKComplicationTimelineEntry(
                date: Date(),
                complicationTemplate: template)
            entries.append(entry)

            dataRead = true
            timer.invalidate()
            handler(entries)
        }
    }
}
handler(entries)가 실행되는 순간 미래의 타임라인 엔트리가 등록됩니다.- 앱 시작 후 바로 등록될 필요는 없으며, 시간차를 두고 등록해도 됩니다.
(예: 네트워크 서버로부터 비동기로 데이터를 받아왔을 때 실행)
- 앱 시작 후 바로 등록될 필요는 없으며, 시간차를 두고 등록해도 됩니다.
- 마지막으로, 시스템에 타임라인 종료 시점을 알려줍니다.
func getTimelineEndDate(for complication: CLKComplication, withHandler handler: @escaping (Date?) -> Void) {
    // Call the handler with the last entry date you can currently provide or nil if you can't support future timelines
    let after = Date().timeIntervalSince1970 + (60 * 60) * 60
    handler(Date(timeIntervalSince1970: after))
}
- 이 메소드의 목적은 다른 앱들로부터 컴플리케이션 스케줄을 분석해 시스템의 자원 사용량을 미리 계산해 최적화하기 위함이라고 합니다.
- 이 시간이 지나면 업데이트 작업을 수행하지 않습니다.
- 앱 실행 후 한 시간 뒤를 타임라인 종료 시점이라고 알려줍니다.
- 이 앱은 타임라인의 종료 시간을 알 수 없기 때문에 한 시간이라고 하였지만, 보통은 타임라인의 마지막 시간을 입력합니다.
- 타임라인이 존재하지 않으면
handler(nil)을 입력합니다.
앱을 닫을 때마다 타임라인 업데이트
- 타임라인은 홈 버튼을 눌러 앱을 닫는 시점마다 갱신되어야 합니다. 인터페이스 컨트롤러 코드의 didDeactivate() 부분에 다음 내용을 추가합니다. (
reloadTimeline은 WatchOS 9 이후 Deprecate 예정)CLKComplicationServer.sharedInstance().reloadTimeline(for: complication)
- if문으로 내용의 변경이 있을때만 업데이트를 실행하도록하면 시스템 자원을 덜 사용할 수 있습니다.


0개의 댓글