스프링 시큐리티 시리즈
- Spring Boot: 시큐리티(Security) – 1
- Spring Boot: 시큐리티(Security) – 2 – 커스텀 로그인 페이지 만들기
- Spring Boot: 시큐리티(Security) – 3 – 로그인 및 권한 정보를 DB에서 가져오기
- Spring Boot: 시큐리티(Security) – 4 – 로그인 폼을 거치지 않고 컨트롤러에서 로그인
- Spring Boot: 시큐리티(Security) – 5 – 권한별 접근 가능한 페이지를 데이터베이스에 설정하기 (동적 설정)
- Spring Boot Security OAuth2: 커스텀 로그인 페이지 구현
1. SecurityConfig 클래스의 configure(http) 에 다음 내용을 추가합니다.
.formLogin().loginPage("/login").failureUrl("/login?error").permitAll()
//
.logout().logoutRequestMatcher(new AntPathRequestMatcher("/logout"))
.addLogoutHandler(new TaskImplementingLogoutHandler()).permitAll().logoutSuccessUrl("/");
loginPage는 로그인할 페이지의 주소이며 로그인이 필요한 상황에서 localhost:xxx/login 을 통해 로그인 화면으로 접속합니다. failureUrl은 로그인 실패했을 때 나타나는 뷰 페이지의 주소입니다. permitAll()이 없으면 권한 문제가 있는 경우 로그인 화면에 들어갈 수 없으므로 반드시 넣어줘야 합니다. loginSuccessUrl은 로그인 성공했을 시 이동할 주소입니다.
2021-01-21 추가: loginSuccessUrl이라는 메소드는 없으며 defaultSuccessUrl 나 successForwardUrl을 한다고 합니다. 주로 전자가 많이 사용된다고 합니다. (둘의 차이점)
.logoutRequestMatcher(new AntPathRequestMatcher("/로그아웃 주소))는 로그아웃을 실행할 주소입니다. 주소창에 localhost:xxx/logout을 입력하면 로그아웃이 될 것입니다. .addLogoutHandler(new TaskImplementingLogoutHandler())는 로그아웃 시 실행할 작업을 입력하며 해당 클래스는 아래에 있습니다. logoutSuccessUrl은 로그아웃 성공시 이동할 주소이다. 만약 logoutSuccessUrl("/login?logout") 을 입력하면 루트 페이지 대신 해당 페이지로 접속하게 됩니다.
이것들을 반영한 SecurityConfig 클래스는 아래와 같습니다.
package com.example.security;

import org.springframework.context.annotation.Bean;
import org.springframework.security.config.annotation.authentication.builders.AuthenticationManagerBuilder;
import org.springframework.security.config.annotation.web.builders.HttpSecurity;
import org.springframework.security.config.annotation.web.configuration.EnableWebSecurity;
import org.springframework.security.config.annotation.web.configuration.WebSecurityConfigurerAdapter;
import org.springframework.security.crypto.bcrypt.BCryptPasswordEncoder;
import org.springframework.security.web.util.matcher.AntPathRequestMatcher;

@EnableWebSecurity
public class SecurityConfig extends WebSecurityConfigurerAdapter {

  @Override
  protected void configure(HttpSecurity http) throws Exception {
    http.authorizeRequests()
    .antMatchers("/adminOnly").hasAuthority("ROLE_ADMIN")
    .antMatchers("/**").permitAll()	// 넓은 범위의 URL을 아래에 배치한다.
    .anyRequest().authenticated()
    .and()
    .formLogin().loginPage("/login").failureUrl("/login?error").permitAll()
    .defaultSuccessUrl("/")
    .and()
    .logout().logoutRequestMatcher(new AntPathRequestMatcher("/logout"))
    .addLogoutHandler(new TaskImplementingLogoutHandler()).permitAll().logoutSuccessUrl("/");
    // 로그아웃 기본 url은 (/logout)
    // 새로 설정하려면 .logoutUrl("url") 사용

  }

  @Override
  protected void configure(AuthenticationManagerBuilder auth) throws Exception {
    auth.inMemoryAuthentication()
    .withUser("admin").password(passwordEncoder().encode("1234")).roles("ADMIN")
    .and()
    .withUser("guest").password(passwordEncoder().encode("guest")).roles("GUEST");

  }

  // passwordEncoder() 추가
  @Bean
  public BCryptPasswordEncoder passwordEncoder() {
    return new BCryptPasswordEncoder();
  }

}
2. TaskImplementingLogoutHandler 클래스를 작성합니다.
package com.example.security;

import javax.servlet.http.HttpServletRequest;
import javax.servlet.http.HttpServletResponse;

import org.slf4j.Logger;
import org.slf4j.LoggerFactory;
import org.springframework.security.core.Authentication;
import org.springframework.security.web.authentication.logout.LogoutHandler;

public class TaskImplementingLogoutHandler implements LogoutHandler {

    Logger logger = LoggerFactory.getLogger(TaskImplementingLogoutHandler.class);


    @Override
    public void logout(HttpServletRequest req, HttpServletResponse res,
            Authentication authentication) {

    	logger.info("로그아웃 되었습니다.");
    }

}
로그아웃 시 필요한 작업을 logout 메소드 안에 작성합니다. 이 부분은 빈 메소드로 작성해도 상관없고, 애초에 클래스 작성이 필수가 아닙니다. Security.configure(http)에서 .addLogoutHandler(new TaskImplementingLogoutHandler()) 부분을 제거하면 로그아웃 핸들러를 사용하지 않습니다. 다만 관리 측면에서 로그아웃 후 후속작업이 필요한 경우가 많기 때문에 핸들러를 만들어놓는 것이 좋습니다.
3. 컨트롤러에 다음을 추가합니다.
@RequestMapping("/login")
public String loginForm() {
  return "login-form";
}
login 페이지를 스프링 기본이 아닌 사용자가 지정한 뷰 페이지로 이동하도록 합니다.
4. 로그인 뷰 페이지를 작성합니다.
<html xmlns:th="https://www.thymeleaf.org">
  <head >
    <title>Please Login</title>
  </head>
  <body>
    <div th:fragment="content">
        <form name="f" th:action="@{/login}" method="post">
            <fieldset>
                <legend>Please Login</legend>
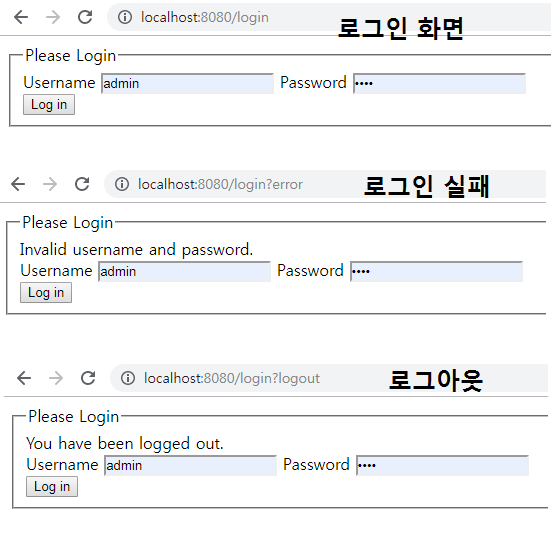
                <div th:if="${param.error}" class="alert alert-error">
                    Invalid username and password.
                </div>
                <div th:if="${param.logout}" class="alert alert-success">
                    You have been logged out.
                </div>
                <label for="username">Username</label>
                <input type="text" id="username" name="username"/>
                <label for="password">Password</label>
                <input type="password" id="password" name="password"/>
                <div class="form-actions">
                    <button type="submit" class="btn">Log in</button>
                </div>
            </fieldset>
        </form>
    </div>
  </body>
</html>
src/main/resources/templates/login-form.html 파일을 작성합니다. 로그인 기능이 동작하게 하기 위해 폼 설정에서 th:action="@{/login}" method="post" 을 추가 하고, 아이디는 name="username", 비밀번호는 name="password"로 설정합니다. param.error, param.logout은 로그인 에러 또는 로그아웃인 경우 해당 파라미터를 통해 로그인에 접속하면 메시지를 표시하는 역할을 합니다.

![]()
스프링 시큐리티 시리즈
- Spring Boot: 시큐리티(Security) – 1
- Spring Boot: 시큐리티(Security) – 2 – 커스텀 로그인 페이지 만들기
- Spring Boot: 시큐리티(Security) – 3 – 로그인 및 권한 정보를 DB에서 가져오기
- Spring Boot: 시큐리티(Security) – 4 – 로그인 폼을 거치지 않고 컨트롤러에서 로그인
- Spring Boot: 시큐리티(Security) – 5 – 권한별 접근 가능한 페이지를 데이터베이스에 설정하기 (동적 설정)
- Spring Boot Security OAuth2: 커스텀 로그인 페이지 구현


5개의 댓글
스프링초절정꽃미남개발군단 · 2021년 1월 20일 11:18 오후
본문 중에 loginSuccessUrl 라고 설명해놨는데 그런거 없단다.
defaultSuccessUrl 나 successForwardUrl 겠지.
수정좀 하거라
글좋으니까
yoonbumtae (BGSMM) · 2021년 1월 21일 7:06 오후
알았다.
스프링초절정꽃미남개발군단 · 2021년 2월 4일 6:02 오후
아주 고오맙다아
참고 링크도 아주 잘보았다!
꿈나무 · 2021년 9월 7일 1:18 오후
안녕하세요, 시큐리티 공부하는데 도움이 많이 되었습니다.
한가지 궁금한게 있는데 /login에 post방식은 controller에 따로 추가한 부분이 없는 것 같은데
어떻게 동작하여 로그인이 되는 것인지 궁금합니다.
yoonbumtae (BGSMM) · 2021년 9월 7일 4:35 오후
스프링 시큐리티에서 자동적으로 get, post 별 작업을 구분해주는 것 같습니다. 똑같은 주소를 get으로 요청하면 로그인 페이지를 보여주고 post로 요청하면 로그인 작업을 처리하는 식입니다.
https://docs.spring.io/spring-security/site/docs/4.1.3.RELEASE/guides/html5/form-javaconfig.html