노래 파일을 불러와 500 구간으로 쪼갠 뒤 각각 구간의 평균 주파수를 리스트에 삽입해 사운드클라우드의 플레이어 비슷한 효과를 내는 예제입니다. 이 기능을 사용하려면 Minim이라는 Processing기반의 라이브러리가 필요합니다. (참고: Processing: 미디어아트 프로그래밍 언어 기초)
Minim을 사용해 음악 파일의 주파수를 분석
- 주파수 분석은 고속 푸리에 변환(FFT) 방식.
- Minim은 음악 재생, 분석과 관련하여 다양한 기능을 제공하는 외부 라이브러리로 원래 Processing 언어의 라이브러리인데 프로세싱 언어 자체가 JVM 기반이므로 자바에서도 사용 가능.
1. Maven Dependency(혹은 외부 jar 파일) 추가
<repositories>
    <repository>
        <id>clojars-repository</id>
        <name>Clojars Repository</name>
        <url>http://clojars.org/repo/</url>
    </repository>
</repositories>

    <!-- https://mvnrepository.com/artifact/ddf.minim/ddf.minim -->
    <dependency>
        <groupId>ddf.minim</groupId>
        <artifactId>ddf.minim</artifactId>
        <version>2.2.0</version>
    </dependency>
https://mvnrepository.com/artifact/ddf.minim/ddf.minim/2.2.0
2. MP3 파일의 주파수를 분석하는 코드 작성.
코드: https://gist.github.com/ayaysir/09d47421dd3f72e94262a715e6cb2f67
This file contains hidden or bidirectional Unicode text that may be interpreted or compiled differently than what appears below. To review, open the file in an editor that reveals hidden Unicode characters.
Learn more about bidirectional Unicode characters
| import java.io.PrintWriter; | |
| import java.util.ArrayList; | |
| import java.util.Arrays; | |
| import java.util.HashMap; | |
| import java.util.List; | |
| import java.util.Map; | |
| import javax.servlet.http.HttpServletResponse; | |
| import org.springframework.stereotype.Controller; | |
| import org.springframework.web.bind.annotation.CrossOrigin; | |
| import org.springframework.web.bind.annotation.RequestMapping; | |
| import com.google.gson.Gson; | |
| import com.springboot.morse.util.MinimImpl; | |
| import ddf.minim.AudioPlayer; | |
| import ddf.minim.AudioSample; | |
| import ddf.minim.Minim; | |
| import ddf.minim.analysis.FFT; | |
| @Controller | |
| @CrossOrigin(origins = "*") | |
| public class SoundController { | |
| @RequestMapping("/sound") | |
| public void freqVisualizer(HttpServletResponse res){ | |
| try { | |
| res.setContentType("text/json"); | |
| Minim minim = MinimImpl.getMinimInstance(); | |
| AudioSample jingle = minim.loadSample("pastorale.mp3", 2048); | |
| // get the left channel of the audio as a float array | |
| // getChannel is defined in the interface BuffereAudio, | |
| // which also defines two constants to use as an argument | |
| // BufferedAudio.LEFT and BufferedAudio.RIGHT | |
| float[] leftChannel = jingle.getChannel(AudioSample.LEFT); | |
| System.out.println("channel length: " + leftChannel.length); | |
| System.out.println("length / 500: " + (leftChannel.length / 500) ); | |
| System.out.println("near pow2: " + (tempPowerOfTwo(leftChannel.length / 500) )); | |
| // timeSize는 2의 제곱만 허용하기 때문에 사이즈에서 제일 가까운(그러나 작으면 안됨) 2의 제곱수를 찾는다. | |
| // then we create an array we'll copy sample data into for the FFT object | |
| // this should be as large as you want your FFT to be. generally speaking, 1024 is probably fine. | |
| int fftSize = (int)(tempPowerOfTwo(leftChannel.length / 500)); | |
| float[] fftSamples = new float[fftSize]; | |
| System.out.println("sample rate: " + jingle.sampleRate()); | |
| FFT fft = new FFT( fftSize, jingle.sampleRate() ); | |
| // now analyze this buffer | |
| fft.forward( fftSamples ); | |
| // now we'll analyze the samples in chunks | |
| int totalChunks = (leftChannel.length / fftSize) + 1; | |
| System.out.println("totalChunks: " + totalChunks); | |
| List<Double> outputFreqArr = new ArrayList<>(); | |
| Map<String, Object> outputMap = new HashMap<String, Object>(); | |
| // allocate a 2-dimensional array that will hold all of the spectrum data for all of the chunks. | |
| // the second dimension if fftSize/2 because the spectrum size is always half the number of samples analyzed. | |
| float[][] spectra = new float[totalChunks][fftSize/2]; | |
| for(int chunkIdx = 0; chunkIdx < totalChunks; ++chunkIdx) | |
| { | |
| int chunkStartIndex = chunkIdx * fftSize; | |
| // the chunk size will always be fftSize, except for the | |
| // last chunk, which will be however many samples are left in source | |
| int chunkSize = Math.min( leftChannel.length – chunkStartIndex, fftSize ); | |
| // copy first chunk into our analysis array | |
| System.arraycopy( leftChannel, // source of the copy | |
| chunkStartIndex, // index to start in the source | |
| fftSamples, // destination of the copy | |
| 0, // index to copy to | |
| chunkSize // how many samples to copy | |
| ); | |
| // if the chunk was smaller than the fftSize, we need to pad the analysis buffer with zeroes | |
| if ( chunkSize < fftSize ) | |
| { | |
| // we use a system call for this | |
| Arrays.fill( fftSamples, chunkSize, fftSamples.length – 1, 0.0F ); | |
| } | |
| // now analyze this buffer | |
| fft.forward( fftSamples ); | |
| // and copy the resulting spectrum into our spectra array | |
| for(int i = 0; i < (fftSize / 2); ++i) | |
| { | |
| spectra[chunkIdx][i] = fft.getBand(i); | |
| } | |
| } | |
| jingle.close(); | |
| double max = -1; | |
| double min = 99; | |
| for(int i = 0; i < spectra.length; i++) { | |
| double sum = 0; | |
| for(int j = 0; j < spectra[i].length; j++) { | |
| // System.out.print(spectra[i][j] + " "); | |
| sum += spectra[i][j]; | |
| } | |
| double ele = (sum / spectra[i].length); | |
| outputFreqArr.add( ele ); | |
| if(max < ele) { | |
| max = ele; | |
| } else if (min > ele){ | |
| min = ele; | |
| } | |
| } | |
| System.out.println("max: " + max); | |
| System.out.println("min: " + min); | |
| outputMap.put("max", max); | |
| outputMap.put("min", min); | |
| outputMap.put("totalChunks;", totalChunks); | |
| outputMap.put("outputFreqArr", outputFreqArr); | |
| String json = new Gson().toJson(outputMap); | |
| System.out.println(json); | |
| PrintWriter xout = res.getWriter(); | |
| xout.print(json); | |
| } catch (Exception e) { | |
| e.printStackTrace(); | |
| } | |
| } | |
| public double tempPowerOfTwo(double numThatNotPowerOfTwo){ | |
| double[] numList = new double[36]; | |
| for(int power = 1; power <= 36; power++) { | |
| numList[power – 1] = (long) Math.pow(2, power); | |
| } | |
| double nearNum = 0; | |
| for(int i = 0; i < numList.length; i++) { | |
| if (numThatNotPowerOfTwo >= numList[35]) { | |
| nearNum = numList[35]; | |
| break; | |
| } else if(numList[i] < numThatNotPowerOfTwo) { | |
| continue; | |
| } else if (numList[i] == numThatNotPowerOfTwo) { | |
| nearNum = numList[i]; | |
| break; | |
| } else { | |
| nearNum = numList[i – 1]; | |
| break; | |
| } | |
| } | |
| return nearNum; | |
| } | |
| } |
This file contains hidden or bidirectional Unicode text that may be interpreted or compiled differently than what appears below. To review, open the file in an editor that reveals hidden Unicode characters.
Learn more about bidirectional Unicode characters
| <!DOCTYPE html> | |
| <html lang="ko"> | |
| <head> | |
| <meta charset="UTF-8"> | |
| <title>주파수 그리기</title> | |
| <style type="text/css"> | |
| canvas { | |
| border: 1px solid black; | |
| } | |
| </style> | |
| <script src="https://code.jquery.com/jquery-3.3.1.min.js"></script> | |
| </head> | |
| <body onload="draw();"> | |
| <canvas id="tutorial" width="748" height="300"> | |
| 캔버스를 지원하지 않는 브라우저입니다. | |
| </canvas> | |
| <p id=loading>로딩중…</p> | |
| <script> | |
| function draw() { | |
| $.get("http://localhost:8080/sound", function(data) { | |
| var canvas = document.getElementById('tutorial') | |
| if (canvas.getContext) { | |
| var ctx = canvas.getContext('2d'); | |
| console.log(data) | |
| $('#tutorial').attr('width', data.totalChunks) | |
| ctx.fillStyle = "rgb(200,0,0)"; | |
| // x는 10 너비에 0부터 10씩 증가, y는 (300 – 길이) 에서 시작 | |
| var freqArray = data.outputFreqArr | |
| console.log(freqArray) | |
| var max = data.max | |
| for (var i in freqArray) { | |
| var colorString = "rgb(" + Math.floor(Math.random() * 200) + "," + | |
| Math.floor(Math.random() * 200) + "," + Math.floor(Math.random() * 200) + ")" | |
| ctx.fillStyle = colorString | |
| ctx.fillRect(i * 1, 300 – (freqArray[i] / max) * 250, 1, (freqArray[i] / max) * 250) | |
| } | |
| } else { | |
| // canvas-unsupported code here | |
| } | |
| }) | |
| } | |
| var loading = $("#loading"); | |
| $(document).ajaxStart(function () { | |
| loading.show(); | |
| }); | |
| $(document).ajaxStop(function () { | |
| loading.hide(); | |
| }); | |
| </script> | |
| </body> | |
| </html> |
대략적인 과정은
- MP3 파일을 읽고 파일의 정보를 바탕으로
<span>ddf.minim.analysis.</span>FFT객체를 생성하는데,timeSize(버퍼 사이즈) 설정시 2의 제곱의 수만 가능하므로 제곱의 수와 제일 근접한timeSize를 설정할 수 있도록 하였습니다. 500으로 나눈 이유는 그래프의 x축 개수를 500개로 정했기 때문입니다. - 음악 파일의 전체 스펙트럼을 2차원 배열로 내보낸 뒤 2차원 배열의
timeSize당 부분을 평균을 산출해 단일 배열로 옮깁니다. min,max정보는 오디오 플레이어에서 그래프를 그리는 기준을 잡는 데 사용합니다.- Minim을 사용하려면 복잡한 과정을 거쳐야되는데 MinimImpl이라는 클래스에서
getInstance로 간단하게 줄일 수 있다. (https://github.com/ddf/Minim/issues/48)
MinimImpl을 패키지 내에 위치시킨 후 임포트해서 다음과 같이 사용합니다.
<span class="pl-smi">Minim</span><span> minim </span><span class="pl-k">=</span><span> </span><span class="pl-smi">MinimImpl</span><span class="pl-k">.</span><span>getMinimInstance();</span>
import ddf.minim.Minim;
import java.io.File;
import java.io.FileInputStream;
import java.io.FileNotFoundException;
import java.io.InputStream;

/**
 * This is a simple implementation of Minim requirements in order to be able to
 * use it outside Processing; in plain Java programs.
 *
 * Usage:
 * Minim instance = MinimImpl.getMinimInstance();
 *
 * Quote from Minim documentation:
 * -----------------------------------------------------------------------------
 * If you are using Minim outside of Processing, then the constructor of Minim
 * requires an Object that can handle two important file system operations
 * so that it doesn’t have to worry about details of the current environment.
 *
 * These two methods are:
 *      String sketchPath( String fileName )
 *      InputStream createInput( String fileName )
 *
 * These are methods that are defined in Processing,
 * which Minim was originally designed to cleanly interface with.
 * The sketchPath method is expected to transform a filename into an absolute path and
 * is used when attempting to create an AudioRecorder (see below).
 * The createInput method is used when loading files and is expected to take a filename,
 * which is not necessarily an absolute path, and return an InputStream that
 * can be used to read the file.
 * For example, in Processing, the createInput method will search in the data folder,
 * the sketch folder, handle URLs, and absolute paths.
 * If you are using Minim outside of Processing,
 * you can handle whatever cases are appropriate for your project.
 * -----------------------------------------------------------------------------
 *
 * Author : Gregory Kotsaftis
 * License: Public Domain.
 */
public final class MinimImpl {

    /**
     * Use this method to obtain a valid Minim instance!
     */
    public static Minim getMinimInstance()
    {
        return new Minim(new MinimImpl());
    }

    /**
     * Override required method.
     */
    public String sketchPath(String fileName)
    {
        return( new File(fileName).getAbsolutePath() );
    }

    /**
     * Override required method.
     */
    public InputStream createInput(String fileName)
        throws FileNotFoundException
    {
        return( new FileInputStream(new File(fileName)) );
    }

}
3. 만들어진 주파수 정보를 바탕으로 오디오 플레이어(자바스크립트) 제작
코드: https://gist.github.com/ayaysir/30c05be68e9201bcf6a9c56d9231741c
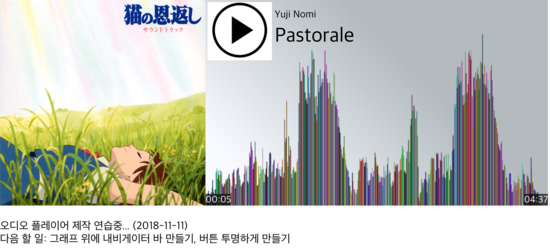
결과: http://yoonbumtae.com/music/pastorale/
This file contains hidden or bidirectional Unicode text that may be interpreted or compiled differently than what appears below. To review, open the file in an editor that reveals hidden Unicode characters.
Learn more about bidirectional Unicode characters
| <!DOCTYPE html> | |
| <html lang="ko"> | |
| <head> | |
| <meta charset="UTF-8"> | |
| <title>주파수 그리기</title> | |
| <style type="text/css"> | |
| body { | |
| margin: 0; | |
| padding: 0; | |
| } | |
| canvas { | |
| border: none; | |
| margin: 0px -4px; | |
| padding: 0px; | |
| } | |
| #divOnCanvas { | |
| position: absolute; | |
| padding: inherit; | |
| left: 300px; | |
| top: 0px; | |
| width: 500px; | |
| height: 300px; | |
| } | |
| #playBtn { | |
| float: left; | |
| } | |
| #metaHeader { | |
| display: inline | |
| } | |
| #artist { | |
| font-size: 15px; | |
| vertical-align: bottom; | |
| } | |
| #title { | |
| font-size: 30px; | |
| vertical-align: top; | |
| } | |
| #playBtn { | |
| border: none; | |
| color: none; | |
| } | |
| .timelabel { | |
| display: inline-block; | |
| /*컨텐츠 너비에 맞추기*/ | |
| font-size: 14px; | |
| background-color: rgba(0, 0, 0, 0.65); | |
| color: white; | |
| } | |
| #timeStart { | |
| position: absolute; | |
| bottom: 0px; | |
| left: px; | |
| } | |
| #timeEnd { | |
| position: absolute; | |
| bottom: 0px; | |
| right: 0px; | |
| } | |
| table {} | |
| </style> | |
| <script src="https://code.jquery.com/jquery-3.3.1.min.js"></script> | |
| </head> | |
| <body onload="draw();"> | |
| <div id=playerWrapper> | |
| <img id=albumArt width=300px height=300px> | |
| <canvas id="tutorial" width="500" height="300"> | |
| 캔버스를 지원하지 않는 브라우저입니다. | |
| </canvas> | |
| <div id=divOnCanvas> | |
| <div id=metaHeader> | |
| <table> | |
| <tr> | |
| <td rowspan=2> | |
| <button type=button id=playBtn><img id=btnImg width=80px height=80px src="https://image.spreadshirtmedia.com/image-server/v1/mp/designs/1010804667,width=178,height=178/fun-play-button-icon.png"> </button> </td> | |
| <td id=artist>Artist</td> | |
| </tr> | |
| <tr> | |
| <td id=title>Title</td> | |
| </tr> | |
| </table> | |
| <div class=timelabel id=timeStart>00:00</div> | |
| <div class=timelabel id=timeEnd>5:55</div> | |
| </div> | |
| </div> | |
| </div> | |
| <p id=loading>로딩중…</p> | |
| <p>오디오 플레이어 제작 연습중… (2018-11-11)<br>다음 할 일: 그래프 위에 내비게이터 바 만들기, 버튼 투명하게 만들기</p> | |
| <script> | |
| $('#playerWrapper').hide(); | |
| Number.prototype.toMS = function(isMillisecond) { | |
| if(isMillisecond){ | |
| var num = parseInt(this) / 1000 | |
| } else { | |
| var num = parseInt(this) | |
| } | |
| // console.log(num) | |
| var min = Math.floor(num / 60) | |
| var sec = Math.floor(num – (min * 60)) | |
| if (min < 10) { | |
| min = "0" + min; | |
| } | |
| if (sec < 10) { | |
| sec = "0" + sec; | |
| } | |
| return min + ":" + sec | |
| } | |
| function draw() { | |
| $.get("pastorale-freq.json", function(data) { | |
| var canvas = document.getElementById('tutorial') | |
| if (canvas.getContext) { | |
| var ctx = canvas.getContext('2d'); | |
| console.log(data) | |
| $('#albumArt').attr('src', data.imgSrc) | |
| $('#tutorial').attr('width', data.totalChunks) | |
| //ctx.fillStyle = "rgb(53,253,233)"; | |
| //선형 그라데이션 | |
| var grad = ctx.createLinearGradient(0, 200, 200, 0); | |
| grad.addColorStop(0, 'rgba(242,246,255,0.5)'); | |
| grad.addColorStop(1, 'rgba(103,120,128,0.5)'); | |
| ctx.fillStyle = grad; | |
| ctx.fillRect(0, 0, 500, 300) | |
| // x는 10 너비에 0부터 10씩 증가, y는 (300 – 길이) 에서 시작 | |
| var freqArray = data.outputFreqArr | |
| console.log(freqArray) | |
| var max = data.max | |
| for (var i in freqArray) { | |
| var colorString = "rgb(" + Math.floor(Math.random() * 200) + "," + | |
| Math.floor(Math.random() * 200) + "," + Math.floor(Math.random() * 200) + ")" | |
| ctx.fillStyle = colorString | |
| ctx.fillRect(i * 1, 300 – (freqArray[i] / max) * 250, 1, (freqArray[i] / max) * 250) | |
| } | |
| // 오디오 | |
| var audioState = { | |
| 0: 'HAVE_NOTHING', | |
| 1: 'HAVE_METADATA', | |
| 2: 'HAVE_CURRENT_DATA', | |
| 3: 'HAVE_FUTURE_DATA', | |
| 4: 'HAVE_ENOUGH_DATA' | |
| } | |
| var audio = new Audio('audio/' + data.metadata.mFileName) | |
| // 메타데이터 | |
| $('#artist').text(data.metadata.mTags.author) | |
| $('#title').text(data.metadata.mTags.title) | |
| console.log(audio.duration) | |
| $('#timeEnd').text(data.metadata.mLength.toMS(true)) | |
| $('#albumArt').attr('title', data.metadata.mTags.album) | |
| // 숨겨져 있던 플레이어 표시 | |
| $('#playerWrapper').show(); | |
| function changeDuration() { | |
| // sl.val(Math.round(audio.currentTime)) | |
| var currentTimeRound = Math.round(audio.currentTime) | |
| $('#timeStart').text(currentTimeRound.toMS()) | |
| } | |
| $('#playBtn').click(function() { | |
| if(!audio.paused){ | |
| audio.pause() | |
| $('#btnImg').attr('src', 'https://image.spreadshirtmedia.com/image-server/v1/mp/designs/1010804667,width=178,height=178/fun-play-button-icon.png') | |
| return; | |
| } | |
| $('#btnImg').attr('src', 'https://banner2.kisspng.com/20180412/qle/kisspng-computer-icons-linkedin-desktop-wallpaper-pause-button-5acf7aca975286.4627736315235468266198.jpg') | |
| audio.play() // 일시정지 상황은 자동 반영됨 | |
| timeCounter = setInterval(() => { | |
| changeDuration() | |
| }, 1000) | |
| }) | |
| } else { | |
| // canvas-unsupported code here | |
| } | |
| }) | |
| } | |
| var loading = $("#loading"); | |
| $(document).ajaxStart(function() { | |
| loading.show(); | |
| }); | |
| $(document).ajaxStop(function() { | |
| loading.hide(); | |
| }); | |
| </script> | |
| </body> | |
| </html> |
지금은 각 과정이 전부 따로 진행되고 있지만, 만약 실제로 서비스할 수 있는(사운드클라우드와 비슷한) 오디오 플레이어를 전통적 MVC 웹 서비스 형태로 제작한다고 한다면
- 음악의 주파수 분석은 파일 업로드 후 최대한 빠르게 진행되어야 합니다
- 매 재생마다 주파수를 분석하는게 아닌 최초 한 번만 분석한 뒤 데이터베이스에 저장하는 형태가 좋을 것 같습니다.
- 음악 파일을 재생할 경우 주파수 정보는 컨트롤러를 통해 JSON 등의 형태로 불러들여 플레이어 전면에 그래프를 그립니다.


0개의 댓글