이 예제는 Swift에서 메모리상에 있는 객체를 직렬화(정확하게는 바이너리 형태로 압축 인코딩)한 뒤 저장 장치에 파일 형태로 저장하고 다시 불러오는 예제입니다.
이 예제는 인스턴스를 파일 형태로 주고받을 경우에 사용하고, 네트워크에서 주로 교환되며 JSON으로 사용 가능한 경우는 JSON을 사용하는 것이 좋습니다.
NSCoding은 원칙적으로 클래스(NSObject를 상속받는)에서만 가능하고, 구조체(struct)는 사용이 불가능합니다. 다만 별도의 트릭을 사용하면 구조체도 일단 사용은 가능하지만, 여러 시도를 해본 결과 구조체 내부가 간단한 경우에만 사용하는 것이 좋으며, 커스텀 타입이 많고 복잡한 경우에는 struct를 사용하면 너무 많은 버그가 발생하기 때문에 프로젝트 내부의 구조체들을 class 형태로 리팩토링하는 것이 좋습니다.
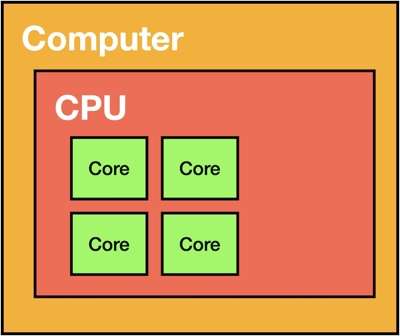
이 예제에는 class Computer, struct CPU, class CPUCore가 있으며 아래와 같은 관계를 가지고 있습니다..
import Foundation

class CPUCore: Codable {

    var constant: Int = 1494
    var coreID = UUID().uuidString
}


struct CPU: Codable {
    var clock: Int!
    var constant: Int!
    var cores: [CPUCore]!

    init(clock: Int, cores: [CPUCore]) {
        self.clock = clock
        self.constant = 999
        self.cores = cores
    }
}


class Computer: Codable {

    var name: String?
    var cpu: CPU?

    init(name: String? = nil, cpu: CPU? = nil) {
        self.name = name
        self.cpu = cpu
    }
}
먼저 NSCoding을 사용하려면 클래스가 NSObject를 상속받아야 하고, NSCoding, NSSecureCoding 프로토콜에 따라야 합니다.
구조체인 struct를 제외한 나머지 클래스에 해당 내용을 작성합니다. 구조체는 클래스 상속이 불가능하며 NSCoding도 클래스에서만 구현 가능하도록 되어 있기 때문에 프로토콜 구현 역시 불가능합니다.
import Foundation

class CPUCore: NSObject, NSCoding, NSSecureCoding, Codable {

}

struct CPU: Codable {

}

class Computer: NSObject, NSCoding, NSSecureCoding, Codable {

}
그러면 두 클래스에 Protocol stub을 추가하라는 메시지가 뜹니다. Fix 버튼을 눌러 추가합니다.

아래와 같은 코드가 추가됩니다.
class Computer: NSObject, NSCoding, NSSecureCoding, Codable {


    func encode(with coder: NSCoder) {

    }

    required init?(coder: NSCoder) {

    }

    static var supportsSecureCoding: Bool = true
}
encode함수에는 인스턴스 내부의 변수들을 인코딩(부호화)하는 과정을 작성해야 합니다.coder를 이용해 내부 변수들을 인코딩하면coder에 인코딩된 변수 내용들이 저장됩니다.required init생성자에는 위에서 인코딩된 내용을 디코딩(복호화)하는 과정을 작성해야 합니다. 역시coder를 이용해 디코딩한 뒤, 디코딩된 변수들을 인스턴스 내부에 수동으로 다시 할당해야 합니다.supportsSecureCoding는secure coding사용 여부를 지정하는데, 최근에는 보안 처리를 사용하지 않는 객체를 다루는 메소드가 거의deprecated되었기 때문에 원활한 사용을 위해 이 옵션을true로 지정해야 합니다.NSSecureCoding프로토콜을 추가한 것도 이러한 보안 처리 적용을 위한 것입니다.
encode 함수에 다음과 같은 코드를 작성합니다.
func encode(with coder: NSCoder) {
    guard let name = name else { return }
    guard let cpu = cpu else { return }

    let cpuCoder = cpu.encoder
    coder.encode(name, forKey: "cpu_name")
    coder.encode(cpuCoder, forKey: "cpu_coder")
}
cpu.encoder는struct의 인코딩을 위해 특수하게 제작된 것으로 밑에서 설명합니다.coder.encode(name, forKey: "cpu_name")– 코더 내부에 인코딩된 데이터를 식별할 때 키(key)가 사용됩니다.cpu_name이라는 키를 지정하고name변수를 인코딩합니다.- 마찬가지로
cpuCoder를cpu_coder키에 인코딩합니다.
디코딩 required init 생성자에 다음을 작성합니다.
init(name: String? = nil, cpu: CPU? = nil) {
    self.name = name
    self.cpu = cpu
}

// ... //

required convenience init?(coder: NSCoder) {
    let decodedName = coder.decodeObject(forKey: "cpu_name")
    let decodedCPUCoder = coder.decodeObject(forKey: "cpu_coder") as? CPU.CPUCoder

    self.init(name: (decodedName as? String), cpu: decodedCPUCoder?.cpu )

}
coder.decodeObject(forKey: "cpu_name") 와 같이 키를 이용해 인코딩된 데이터를 가져온 뒤, self.name = decodedName처럼 재배정을 하거나 위의 코드처럼 식별자를 다시 호출하는 식으로 인스턴스를 초기화합니다.
이 코드에서는 식별자를 다시 호출하는 방식을 사용했기 때문에 convenience 키워드를 추가합니다.
다음은 struct인 CPU 구조체를 인코딩하려고 합니다. 그런데 구조체는 NSObject 상속이 불가능하기 때문에 Computer 클래스와 같은 방식을 사용할 수 없습니다.
이러한 구조체를 NSObject를 상속한 구조체 내부 클래스에 래핑(wrapping)하는 방식으로 가능하게 할 수 있습니다.
CPU 구조체에 대한 extension을 추가한 뒤, 아래와 같은 코드를 작성합니다.
extension CPU {
    var encoder: CPUCoder {
        return CPUCoder(cpu: self)
    }

    // Nested class 'CPU.CPUCoder' has an unstable name when archiving via 'NSCoding'
    // For compatibility with existing archives, use '@objc' to record the Swift 3 runtime name
    @objc(_TtCV8MusicBox3CPU8CPUCoder) class CPUCoder: NSObject, NSCoding, NSSecureCoding {

        var cpu: CPU?

        init(cpu: CPU) {
            super.init()
            self.cpu = cpu
        }

        static var supportsSecureCoding: Bool = true

        func encode(with coder: NSCoder) {
            coder.encode(cpu?.clock, forKey: "clock")
            coder.encode(cpu?.constant, forKey: "constant")
            coder.encode(cpu?.cores, forKey: "cores")
        }

        required init?(coder: NSCoder) {
            let clock = coder.decodeObject(forKey: "clock")
            let constant = coder.decodeObject(forKey: "constant")

            guard let cores = coder.decodeObject(forKey: "cores") as? [CPUCore] else {
                return
            }

            cpu = CPU(clock: clock as! Int, cores: cores)
            cpu?.constant = constant as? Int
        }

    }
}
CPUCoder는 구조체CPU에 대한 인스턴스를 담고 있는NSObject클래스입니다. 구조체 내부에 클래스(nested class)를 작성하였습니다.@objc(***) class–NSCoding에서 네스티드 클래스는 위의 코멘트에 달린 것과 같이 unstable하다고 하기 때문에 컴파일러에서 오류가 발생하게 됩니다. 컴파일러에서 제시해주는 클래스 이름_TtCV8MusicBox3CPU8CPUCoder을 사용해 obejctive-c 환경에서 정상 동작하도록 조치합니다.- 이하 과정은
Computer에서 설명한 내용과 같습니다. CPU구조체에encoder변수를 추가합니다. 이 변수는 인스턴스 자신을 파라미터로 하는CPUCoder타입의 인스턴스를 리턴합니다.
다시 Computer의 encode 함수를 살펴보면
func encode(with coder: NSCoder) {
    guard let name = name else { return }
    guard let cpu = cpu else { return }

    let cpuCoder = cpu.encoder
    coder.encode(name, forKey: "cpu_name")
    coder.encode(cpuCoder, forKey: "cpu_coder")
}
왜 cpu를 그대로 인코딩하지 않고 cpu.encoder를 사용했는지 알게 됩니다. NSObject를 상속받을 수 없는 구조체는 코더에서 지원하지 않는 타입이라는 이유로 디코딩을 지원하지 않기 때문에 (인코딩은 가능합니다) 구조체 인스턴스를 NSObject 클래스 속에 숨겨 코더를 속이는 것입니다.
self.init(name: (decodedName as? String), cpu: decodedCPUCoder?.cpu )
디코딩 과정(required init)에서는 CPUCoder타입이 아닌 원래 CPU 구조체 타입을 사용해야 하기 때문에 숨겨두었던 cpu 인스턴스를 다시 꺼냅니다.
CPUCore 클래스도 위와 마찬가지로 NSCoding과 관련된 내용을 작성합니다.
class CPUCore: NSObject, NSCoding, NSSecureCoding, Codable {

    var constant: Int = 1494
    var coreID = UUID().uuidString

    static var supportsSecureCoding: Bool = true

    override init() {
        super.init()
    }

    init(constant: Int, coreID: String) {
        super.init()
        self.constant = constant
        self.coreID = coreID
    }

    func encode(with coder: NSCoder) {
        coder.encode(constant, forKey: "constant")
        coder.encode(coreID, forKey: "coreID")
    }

    required init?(coder: NSCoder) {
        super.init()

        let constant = coder.decodeInteger(forKey: "constant")
        guard let coreID = coder.decodeObject(forKey: "coreID") as? String else {
            return
        }

        self.constant = constant
        self.coreID = coreID
    }
}
CPU 구조체에서 사용했던 방식을 이 클래스에서는 사용할 수 없었던 이유는 var cores: [CPUCore]! 와 같이 배열에 담겨 사용되었기 때문입니다. 제 생각에는 이 클래스(원래는 구조체)도 같은 방식으로 내부에 래핑 클래스를 만든 뒤, 코딩 과정에서 map 등을 사용해 변환하면 되지 않을까 생각했었습니다. 하지만 결국 배열에서는 이러한 방법을 사용하지 못했는데 인코딩 과정에서 참조 관계가 꼬이는 관계로 인코딩은 정상적으로 진행되었으나 디코딩 과정에서 특정 변수에 nil이 발생해 진행이 불가능했기 때문입니다.
Swift(스위프트) 기초: struct (구조체; structures) 이 글에서도 나온 바와 같이 애플은 objective-c와 호환 가능해야 하는 경우에는 구조체보다 클래스를 사용하도록 권장하고 있는데, NSCoding이 바로 이러한 케이스입니다. 구조가 단순한 경우에는 구조체 사용도 가능하지만, 버그로 인한 스트레스를 겪지 않으려면 클래스를 사용하는 것이 좋다고 생각합니다.
다음은 이렇게 재정의된 클래스(+구조체)들을 이용해 저장 장치에 인코딩한 파일을 저장하고 불러오는 과정입니다.
import Foundation

class FileUtil {

    static func getDocumentsDirectory() -> URL {
        let paths = FileManager.default.urls(for: .documentDirectory, in: .userDomainMask)
        let documentsDirectory = paths[0]
        return documentsDirectory
    }
}
override func viewDidLoad() {

    let cpu = CPU(clock: 1, cores: [CPUCore(), CPUCore(), CPUCore(), CPUCore()])
    let computer = Computer(name: "sejin", cpu: cpu)
    print(FileUtil.getDocumentsDirectory())


    do {
        let url = FileUtil.getDocumentsDirectory().appendingPathComponent("ss").appendingPathExtension("ccc")
        let archived = try NSKeyedArchiver.archivedData(withRootObject: computer, requiringSecureCoding: false)
        try archived.write(to: url)
        print("archived success:", archived)

        let dataFromDisk = try Data(contentsOf: url)
        guard let unarchived = try NSKeyedUnarchiver.unarchivedObject(ofClasses: [Computer.self, NSString.self, NSNumber.self, CPU.CPUCoder.self, CPUCore.self, NSArray.self], from: dataFromDisk) as? Computer else {
            return
        }
        print(unarchived.cpu!, unarchived.name!, unarchived.cpu!.cores![0].coreID)

    } catch {
        print(error)
    }
}
cpu,computer– 인스턴스입니다.url– 인코딩된 데이터 파일을 저장할 주소입니다.document폴더를 사용헀습니다.try NSKeyedArchiver.archivedData–computer객체를 인코딩합니다.try archived.write(to: url)– 데이터를 url주소 파일에 저장합니다.try Data(contentsOf: url)– 파일에서 데이터를 읽어옵니다.try NSKeyedUnarchiver.unarchivedObjectofClasses:배열에는 인코딩 과정에서 사용되거나 참조된 모든 클래스의 목록을 적어야 합니다.- 특히 배열이 있는 경우에는
NSArray.self를 반드시 적어줘야 합니다. 이번 예제에는 사전(dictionary)가 사용되지 않았지만 아마 사전도NSDictionary.self가 필요할 것이라고 생각합니다. NSString.self,NSNumber.self와 같은 경우는 디코딩은 가능하지만 컴파일러에서 타입을 추가하라는 경고가 뜹니다.
as? Computer–Any?타입을Computer타입으로 다운캐스팅합니다.


전체 코드
import Foundation

class CPUCore: NSObject, NSCoding, NSSecureCoding, Codable {

    var constant: Int = 1494
    var coreID = UUID().uuidString

    static var supportsSecureCoding: Bool = true

    override init() {
        super.init()
    }

    init(constant: Int, coreID: String) {
        super.init()
        self.constant = constant
        self.coreID = coreID
    }

    func encode(with coder: NSCoder) {
        coder.encode(constant, forKey: "constant")
        coder.encode(coreID, forKey: "coreID")
    }

    required init?(coder: NSCoder) {
        super.init()

        let constant = coder.decodeInteger(forKey: "constant")
        guard let coreID = coder.decodeObject(forKey: "coreID") as? String else {
            return
        }

        self.constant = constant
        self.coreID = coreID
    }
}


struct CPU: Codable {
    var clock: Int!
    var constant: Int!
    var cores: [CPUCore]!

    init(clock: Int, cores: [CPUCore]) {
        self.clock = clock
        self.constant = 999
        self.cores = cores
    }
}

extension CPU {
    var encoder: CPUCoder {
        return CPUCoder(cpu: self)
    }

    // Nested class 'CPU.CPUCoder' has an unstable name when archiving via 'NSCoding'
    // For compatibility with existing archives, use '@objc' to record the Swift 3 runtime name
    @objc(_TtCV8MusicBox3CPU8CPUCoder) class CPUCoder: NSObject, NSCoding, NSSecureCoding {

        var cpu: CPU?

        init(cpu: CPU) {
            super.init()
            self.cpu = cpu
        }

        static var supportsSecureCoding: Bool = true

        func encode(with coder: NSCoder) {
            coder.encode(cpu?.clock, forKey: "clock")
            coder.encode(cpu?.constant, forKey: "constant")
            coder.encode(cpu?.cores, forKey: "cores")
            print("values", cpu?.cores as Any)
        }

        required init?(coder: NSCoder) {
            let clock = coder.decodeObject(forKey: "clock")
            let constant = coder.decodeObject(forKey: "constant")

            guard let cores = coder.decodeObject(forKey: "cores") as? [CPUCore] else {
                return
            }

            cpu = CPU(clock: clock as! Int, cores: cores)
            cpu?.constant = constant as? Int
        }

    }
}

class Computer: NSObject, NSCoding, NSSecureCoding, Codable {

    var name: String?
    var cpu: CPU?

    init(name: String? = nil, cpu: CPU? = nil) {
        self.name = name
        self.cpu = cpu
    }

    func encode(with coder: NSCoder) {
        guard let name = name else { return }
        guard let cpu = cpu else { return }

        let cpuCoder = cpu.encoder
        coder.encode(name, forKey: "cpu_name")
        coder.encode(cpuCoder, forKey: "cpu_coder")
    }

    required convenience init?(coder: NSCoder) {
        let decodedName = coder.decodeObject(forKey: "cpu_name")
        let decodedCPUCoder = coder.decodeObject(forKey: "cpu_coder") as? CPU.CPUCoder

        self.init(name: (decodedName as? String), cpu: decodedCPUCoder?.cpu )

    }

    static var supportsSecureCoding: Bool = true
}


0개의 댓글